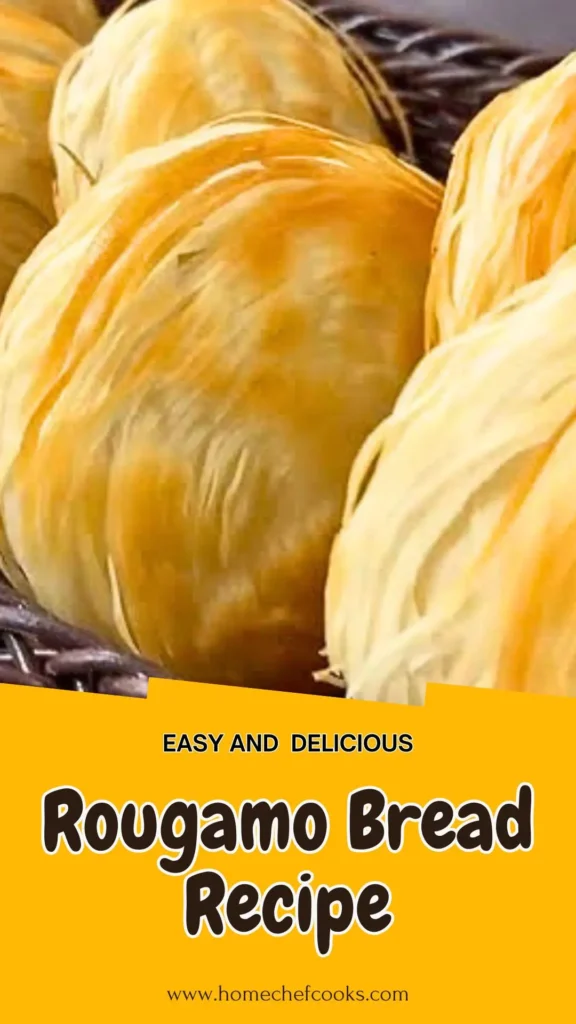
Craving the irresistible crunch and tender layers of authentic Chinese street food? This roujiamo bread recipe brings the legendary flavors of Xi’an right into your kitchen. Often called the “Chinese hamburger,” chinese rougamo bread features flaky, crispy layers enveloping savory braised pork, making it a standout in traditional Chinese cuisine. Whether you’re a street food enthusiast or a home cook eager to try something new, learning how to make rougamo bread is a rewarding culinary adventure.
While the process may seem intricate, mastering the dough and layering technique is simpler than it looks. The magic of roujiamo bread lies in its perfectly balanced texture-crispy on the outside, tender and chewy on the inside-paired with a rich, flavorful filling. With careful attention to each step, you can recreate the authentic taste of chinese rougamo bread without ever leaving your kitchen.
This guide is designed for both beginners and seasoned cooks, breaking down each stage of preparation, from kneading the dough to layering with lard and filling with braised pork. By following these detailed instructions, you’ll soon know exactly how to make rougamo bread that rivals the iconic street vendors of Xi’an. Prepare to delight your taste buds and impress your family and friends with this timeless Chinese classic.
What is Rougamo Bread and How Does It Taste?
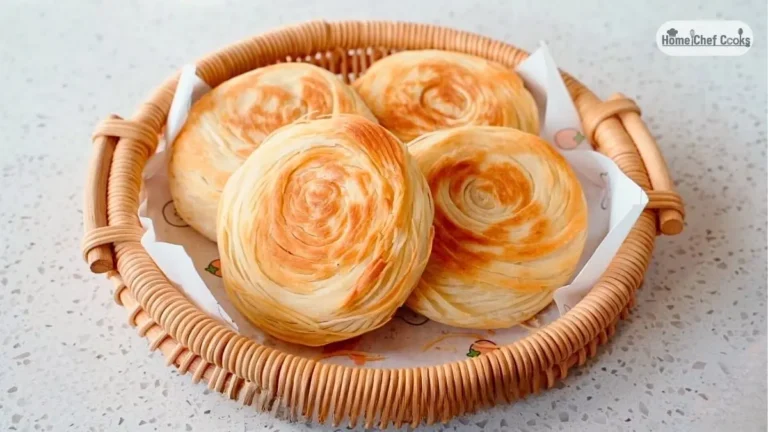
Rougamo bread also called roujiamo, is a signature street food from Shaanxi Province, particularly Xi’an, dating back over 2,000 years. This iconic chinese rougamo bread consists of a crispy, layered flatbread stuffed with succulent braised pork belly, fresh herbs, and peppers.
The bread itself features a remarkable texture contrast-an ultra-crispy, golden exterior that shatters with each bite, revealing soft, cloud-like layers within. The flavor profile is subtly savory with a hint of richness from the lard, creating the perfect vessel for the aromatic, spice-infused pork filling.
Think of it as a sophisticated fusion between a flaky biscuit and a sturdy flatbread, designed specifically to cradle juicy, flavorful meat without becoming soggy.
Rougamo Bread Recipe Ingredients
For the Dough:
- 500 g all-purpose flour (medium gluten works well)
- 5 g baking powder
- 250–260 g warm water (260 g if kneading by hand; 230–240 g if using stand mixer)
- 5–6 g salt (optional)
Layering & Crisping:
- 60–80 g melted lard or clarified pork fat (essential for authentic crispiness-do not substitute with oil)
For Cooking:
- Extra lard for the pan, as needed
For the Filling (Traditional):
- Braised pork belly, chopped (homemade red-braised pork or taro pork)
- 1 green bell pepper, diced
- 1–2 tbsp fresh cilantro, chopped
- Braising sauce (optional, for extra moisture and flavor)
Kitchen Utensils
- Large mixing bowl
- Stand mixer with dough hook (optional but helpful)
- Rolling pin
- Sharp knife or special Roujiamo wire cutter
- Pastry brush
- Flat pan or electric griddle
- Baking tray
- Kitchen scale (for precise measurements)
- Clean kitchen towel or plastic wrap
Preparation and Cooking Time
Prep Time: 30 minutes
Resting Time: 1 hour 30 minutes
Cooking Time: 25–30 minutes
Total Time: 2 hours 30 minutes
Servings: 6–8 rougamo breads
Copycat Rougamo Bread Recipe
Step 1: Make the Dough
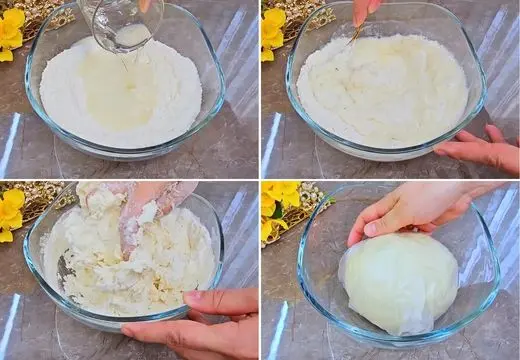
Mix the all-purpose flour and baking powder in a large bowl. Gradually add warm water while stirring with chopsticks or a wooden spoon. Once the mixture comes together, knead by hand or with a stand mixer on medium speed for about 10 minutes. The dough should become smooth and fairly stiff-not soft like steamed bun dough. If it feels excessively dry, add 5–10 g more water. Finish by kneading by hand until the surface is completely smooth. Cover with a damp towel and rest for 20 minutes.
Step 2: Second Knead & Long Rest
After the initial rest, knead the dough again for 3–5 minutes until it becomes even smoother and more elastic. This second kneading develops the gluten structure necessary for those signature layers. Cover the dough and let it relax at room temperature for 1 hour. This extended rest is crucial for achieving the paper-thin sheets in the next steps.
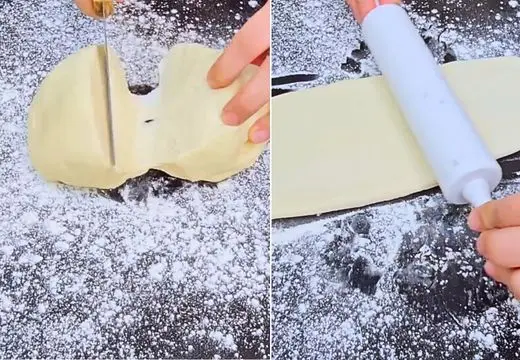
Step 3: Divide the Dough
Transfer the rested dough to a clean work surface. Divide it into 3–4 equal portions (smaller pieces are much easier to roll by hand). Keep the unused portions covered with plastic wrap or a damp towel to prevent them from drying out.
Step 4: Roll into a Very Long Thin Sheet
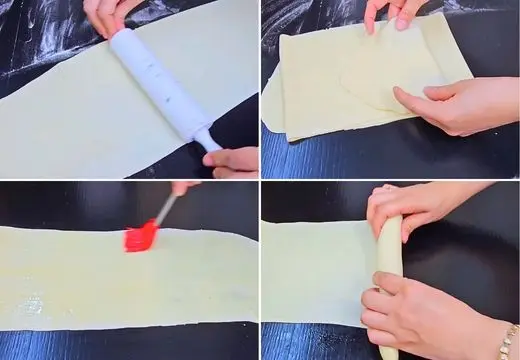
Take one portion and roll it into a long strip using your hands. Then use a rolling pin to roll it out as long and thin as humanly possible-aim for almost 2 meters long and paper-thin. You should be able to see your work surface or table pattern through the dough. Keep the width narrow, about 15–18 cm. Pull and stretch gently while rolling to achieve maximum length and thinness.
Step 5: Brush with Lard and Begin Rolling
Brush the entire surface of the thin dough sheet with a thin, even layer of melted lard using a pastry brush. Starting from one end, begin rolling it up loosely like a Swiss roll, rolling from left to right to create distinct layers. When you reach approximately halfway through the sheet, stop rolling.
Step 6: Cut into Fine Strands (Wire-Drawing Step)
Using a special Roujiamo wire cutter or a very sharp knife, cut the remaining unrolled portion into extremely fine strands resembling thin noodles. This “wire-drawing” technique creates additional layers and texture. Ensure every strand gets coated with a little lard for optimal crispiness.
Step 7: Finish Rolling
Continue rolling the strand-covered portion until everything is rolled into one long rope. The outside should be completely wrapped in those fine strands, creating a beautiful spiral pattern. The strands will create pockets of air and flakiness during cooking.
Step 8: Shape into Cones & Divide
Pinch and twist the rolled rope while simultaneously squeezing with one hand and rotating with the other. The roll will naturally break into two cone-shaped pieces. Cover these pieces and let them relax for 10–15 minutes. This rest allows the gluten to relax, making them easier to flatten.

Step 9: Flatten and Roll into Rounds
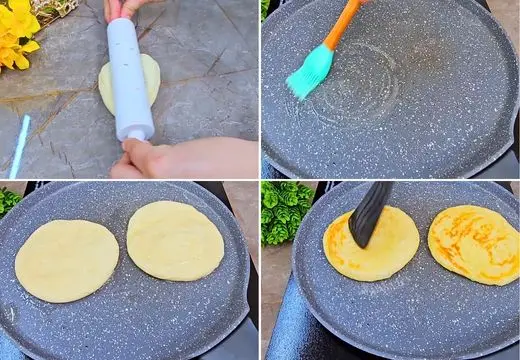
Gently squash each cone from the top, pressing the pointed end toward the center to create a disc. Flip it over-this step is important to keep the spiral pattern intact on top. Roll each piece into a round cake about 1–1.5 cm thick. Don’t worry about achieving perfect circles; rustic shapes are authentic.
Step 10: Pan-Fry
Heat an ungreased or very lightly oiled flat pan or electric griddle over medium-low heat. Place the rougamo bread rounds pattern-side down. Cook until lightly golden on the bottom, then flip carefully. Cook the other side until both surfaces develop some color and the cake starts to puff slightly. Avoid over-browning at this stage, as the bread will finish in the oven.
Step 11: Bake
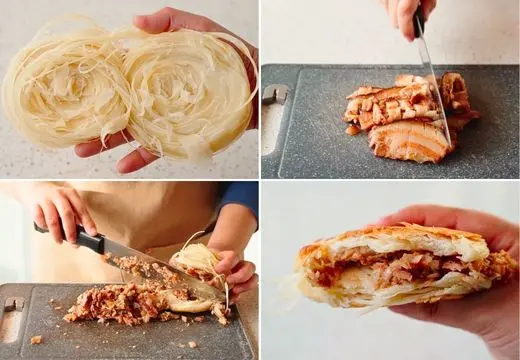
Preheat your oven to 230°C (450°F) with both top and bottom heat for at least 15–20 minutes. Transfer the pan-fried buns to a baking tray and bake in the middle rack for 10–15 minutes. Home ovens typically require 12–15 minutes, while professional ovens only need 3–5 minutes at 240°C. The chinese rougamo bread will puff up dramatically and become incredibly crispy on the outside while remaining soft and layered inside.
Step 12: Assemble the Roujiamo
Allow the baked rougamo bread to cool for 3–5 minutes. Split each bun open horizontally but don’t cut all the way through-leave one edge intact to create a pocket. Stuff generously with chopped braised pork belly, diced green bell pepper, fresh cilantro, and drizzle with a little braising sauce for extra moisture and flavor.
7 Customization and Pairing Ideas for Serving
1. Spicy Cumin Lamb Variation: Transform your roujiamo bread into a Xinjiang-style treat by stuffing it with cumin-spiced lamb instead of pork. Sauté thinly sliced lamb with generous amounts of ground cumin, chili flakes, onions, and fresh cilantro. The aromatic spices complement the crispy bread beautifully and offer a bolder flavor profile perfect for those who love heat.
2. Vegetarian Buddhist-Style Filling: Create a meat-free version using braised shiitake mushrooms, pressed tofu, or seitan as your protein base. Season with soy sauce, star anise, and Sichuan peppercorns to mimic the complexity of traditional braised pork. Add shredded cabbage, pickled vegetables, and fresh herbs for texture and brightness.
3. Sichuan-Style Hot and Numbing: For fans of Sichuan cuisine, incorporate málà (numbing-spicy) flavors by tossing your braised pork with Sichuan peppercorns and chili oil before stuffing. Add pickled mustard greens and thinly sliced scallions for a tangy counterpoint that cuts through the richness.
4. Breakfast Sandwich Version: Turn your chinese rougamo bread into a fusion breakfast by stuffing it with scrambled eggs, crispy bacon or Chinese sausage (lap cheong), and a smear of hoisin sauce. The flaky bread works wonderfully as a morning vessel, especially when paired with hot soy milk or congee.
5. Modern Fusion Fillings: Experiment with contemporary twists like Korean-style bulgogi beef, Japanese teriyaki chicken, or even pulled barbecue pork. The neutral yet flavorful rougamo bread serves as an excellent canvas for various Asian-fusion combinations while maintaining its textural integrity.
6. Condiment Bar Setup: When serving roujiamo for gatherings, create a condiment station with chili oil, black vinegar, pickled radishes, fresh cilantro, sliced jalapeños, and different braising sauces. This allows guests to customize their bread to their preferred spice level and flavor intensity.
7. Perfect Beverage Pairings: Serve your rougamo bread recipe with traditional Chinese accompaniments like cold sour plum drink (suanmeitang), jasmine tea, or even a light beer. For non-traditional pairings, try craft beers with citrus notes or a crisp Riesling that can cut through the rich, fatty pork filling.
7 Essential Tips for Perfect Rougamo Bread
1. Don’t Skip the Lard: The single most important element in an authentic rougamo bread recipe is using real lard or clarified pork fat. Oil simply cannot replicate the flavor, crispiness, and flakiness that animal fat provides. The lard creates steam pockets between layers and contributes to that signature shattering texture. If you’re concerned about dietary restrictions, rendered duck fat can serve as an alternative, but vegetable oils will result in a fundamentally different bread.
2. Achieve Paper-Thin Dough: The key to spectacular layering lies in rolling your dough impossibly thin-aim for translucency where you can see your work surface through the dough. This requires patience and a well-rested dough that has relaxed gluten. Work in a cool environment if possible, and don’t rush this step. The thinner you roll, the more dramatic the layers and the crispier the final chinese rougamo bread will be.
3. Master the Wire-Cutting Technique: The “wire-drawing” step where you cut fine strands creates the bread’s distinctive texture. Use the sharpest knife you have or invest in a proper wire cutter if you plan to make roujiamo bread regularly. Cut the strands as uniformly thin as possible-inconsistent thickness leads to uneven cooking and texture. Each strand should be coated with lard to prevent them from sticking together.
4. Control Your Heat Carefully: When pan-frying, use medium-low heat exclusively. High heat will brown the exterior too quickly before the interior cooks through, and you’ll miss the opportunity for proper puffing in the oven. The pan-frying stage is merely to set the structure and create a light golden base-the real magic happens during baking when the bread puffs and crisps simultaneously.
5. Preheat Your Oven Thoroughly: A properly preheated oven at 230°C (450°F) is non-negotiable when learning how to make rougamo bread successfully. The intense, immediate heat causes rapid steam formation between the layers, creating that dramatic puff and crispy exterior. An under-heated oven results in dense, chewy bread instead of the desired light, crispy texture. Use an oven thermometer to verify accuracy.
6. Time Your Filling Assembly: Always let the baked rougamo bread cool for 3–5 minutes before cutting and filling. If you stuff it immediately, the residual heat will steam the filling and make the bread soggy. However, don’t let it cool completely either-warm bread provides the best textural contrast with the hot filling. Split it carefully to maintain the structural integrity of the layers.
7. Practice Makes Perfect: Don’t be discouraged if your first batch doesn’t achieve restaurant-quality results. Making authentic rougamo Chinese bread is a technique-driven process that improves significantly with repetition. Focus on one challenging step per attempt-maybe perfecting the thinness of your rolled dough the first time, then mastering the wire-cutting the second time. Document your process with photos to track improvement and identify areas needing adjustment.
Storage and Reheating Guidance
Store unfilled rougamo bread in an airtight container at room temperature for up to 2 days, or freeze for up to 1 month. Reheat in a 200°C oven for 5–7 minutes to restore crispiness-never microwave, as this makes the bread chewy and destroys the delicate layers.

Rougamo Bread Recipe
Ingredients
Equipment
Method
- Mix the all-purpose flour and baking powder in a large bowl. Gradually add warm water while stirring with chopsticks or a wooden spoon. Once the mixture comes together, knead by hand or with a stand mixer on medium speed for about 10 minutes. The dough should become smooth and fairly stiff-not soft like steamed bun dough. If it feels excessively dry, add 5–10 g more water. Finish by kneading by hand until the surface is completely smooth. Cover with a damp towel and rest for 20 minutes.
- After the initial rest, knead the dough again for 3–5 minutes until it becomes even smoother and more elastic. This second kneading develops the gluten structure necessary for those signature layers. Cover the dough and let it relax at room temperature for 1 hour. This extended rest is crucial for achieving the paper-thin sheets in the next steps.
- Transfer the rested dough to a clean work surface. Divide it into 3–4 equal portions (smaller pieces are much easier to roll by hand). Keep the unused portions covered with plastic wrap or a damp towel to prevent them from drying out.
- Take one portion and roll it into a long strip using your hands. Then use a rolling pin to roll it out as long and thin as humanly possible-aim for almost 2 meters long and paper-thin. You should be able to see your work surface or table pattern through the dough. Keep the width narrow, about 15–18 cm. Pull and stretch gently while rolling to achieve maximum length and thinness.
- Brush the entire surface of the thin dough sheet with a thin, even layer of melted lard using a pastry brush. Starting from one end, begin rolling it up loosely like a Swiss roll, rolling from left to right to create distinct layers. When you reach approximately halfway through the sheet, stop rolling.
- Using a special Roujiamo wire cutter or a very sharp knife, cut the remaining unrolled portion into extremely fine strands resembling thin noodles. This “wire-drawing” technique creates additional layers and texture. Ensure every strand gets coated with a little lard for optimal crispiness.
- Continue rolling the strand-covered portion until everything is rolled into one long rope. The outside should be completely wrapped in those fine strands, creating a beautiful spiral pattern. The strands will create pockets of air and flakiness during cooking.
- Pinch and twist the rolled rope while simultaneously squeezing with one hand and rotating with the other. The roll will naturally break into two cone-shaped pieces. Cover these pieces and let them relax for 10–15 minutes. This rest allows the gluten to relax, making them easier to flatten.
- Gently squash each cone from the top, pressing the pointed end toward the center to create a disc. Flip it over-this step is important to keep the spiral pattern intact on top. Roll each piece into a round cake about 1–1.5 cm thick. Don’t worry about achieving perfect circles; rustic shapes are authentic.
- Heat an ungreased or very lightly oiled flat pan or electric griddle over medium-low heat. Place the rougamo bread rounds pattern-side down. Cook until lightly golden on the bottom, then flip carefully. Cook the other side until both surfaces develop some color and the cake starts to puff slightly. Avoid over-browning at this stage, as the bread will finish in the oven.
- Preheat your oven to 230°C (450°F) with both top and bottom heat for at least 15–20 minutes. Transfer the pan-fried buns to a baking tray and bake in the middle rack for 10–15 minutes. Home ovens typically require 12–15 minutes, while professional ovens only need 3–5 minutes at 240°C. The chinese rougamo bread will puff up dramatically and become incredibly crispy on the outside while remaining soft and layered inside.
- Allow the baked rougamo bread to cool for 3–5 minutes. Split each bun open horizontally but don’t cut all the way through-leave one edge intact to create a pocket. Stuff generously with chopped braised pork belly, diced green bell pepper, fresh cilantro, and drizzle with a little braising sauce for extra moisture and flavor.
Video
Notes
Common Queries and FAQs
Q: Can I substitute the lard with vegetable oil or butter in this rougamo bread recipe?
A: While technically possible, substituting lard dramatically changes the authentic texture and flavor. Lard creates the signature flakiness and crispiness that defines traditional chinese rougamo bread. Butter might work as a secondary option, but vegetable oils lack the properties needed for proper layering. For the most authentic results, lard is essential.
Q: Why is my rougamo bread dense instead of flaky and layered?
A: Dense roujiamo bread typically results from three issues: not rolling the dough thin enough, insufficient lard between layers, or inadequate oven temperature. Ensure you roll the dough almost translucent, brush generous lard on every surface, and verify your oven reaches 230°C before baking.
Q: How long should I knead the dough when making rougamo bread?
A: Knead for approximately 10 minutes during the first session until the dough becomes smooth and slightly stiff. After the 20-minute rest, knead again for 3–5 minutes. Proper kneading develops the gluten structure necessary for rolling the dough paper-thin without tearing.
Q: Can I make rougamo bread without an oven?
A: Traditional methods use a tandoor-like clay oven, but modern recipes require an oven for the dramatic puffing. You can achieve decent results by covering the pan and cooking over very low heat for longer, but the texture won’t match oven-baked chinese rougamo bread. An electric griddle with a lid can also work.
Q: What’s the difference between rougamo and roujiamo?
A: These terms refer to the same dish. “Roujiamo” is the standard Mandarin pronunciation, while “rougamo” is a dialectical variation. Both describe the famous Xi’an-style flatbread sandwich filled with braised meat.
Q: Can I prepare the dough for rougamo bread in advance?
A: Yes! Prepare the dough through the first rest, then refrigerate it wrapped tightly in plastic for up to 24 hours. Bring it to room temperature for 30 minutes before dividing and rolling. You can also freeze shaped, uncooked rounds for up to 1 month-cook directly from frozen, adding 2–3 minutes to the pan-frying time.
Q: Why does my rougamo bread recipe dough keep shrinking when I roll it?
A: Shrinking dough indicates the gluten is too tight and hasn’t relaxed sufficiently. Ensure you’re allowing the full resting times-20 minutes after the first knead and 60 minutes after the second. Additionally, the 10–15 minute rest after shaping into cones is crucial. If it continues shrinking, cover the dough and let it rest another 15–20 minutes.
Q: What type of braised pork works best for filling roujiamo bread?
A: Traditional Xi’an-style roujiamo uses pork belly braised with over 20 spices including star anise, cinnamon, and bay leaves. The pork should be tender enough to chop easily but not fall-apart soft. Red-braised pork belly (hong shao rou) or Dongpo pork work excellently as alternatives.
Mastering this rougamo bread recipe opens the door to one of China’s most beloved street foods-a dish that perfectly balances crispy, flaky bread with succulent, aromatic fillings. While the process requires patience and practice, especially when learning how to make rougamo bread with those signature paper-thin layers, the results are absolutely worth the effort. Each bite delivers an unforgettable textural contrast that showcases centuries of culinary refinement.
Whether you’re preparing traditional braised pork or experimenting with creative fusion fillings, this chinese rougamo bread serves as the perfect foundation for countless delicious variations. Now it’s time to fire up your oven and experience the magic of authentic roujiamo bread right from your own kitchen!
We’d love to hear how this recipe turns out for you! Give it a try, then drop a comment below to share your thoughts and tips with us.
This rougamo bread was so crackly and addictive!
Thanks
So crackly and addictive
Thanks Amelia