
There’s something magical about Dairy Queen gravy that keeps fans coming back for more. That smooth, peppery, country-style gravy perfectly complements their chicken strips and fries, creating comfort food at its finest.
If you’ve ever wondered how to make Dairy Queen gravy in your own kitchen, you’re in for a treat. This copycat Dairy Queen gravy recipe recreates that signature creamy texture and savory flavor using simple pantry staples.
Whether you’re craving a taste of DQ at home or want to elevate your homemade meals, this DQ gravy recipe delivers restaurant-quality results in just minutes.
What Does Dairy Queen Gravy Taste Like?
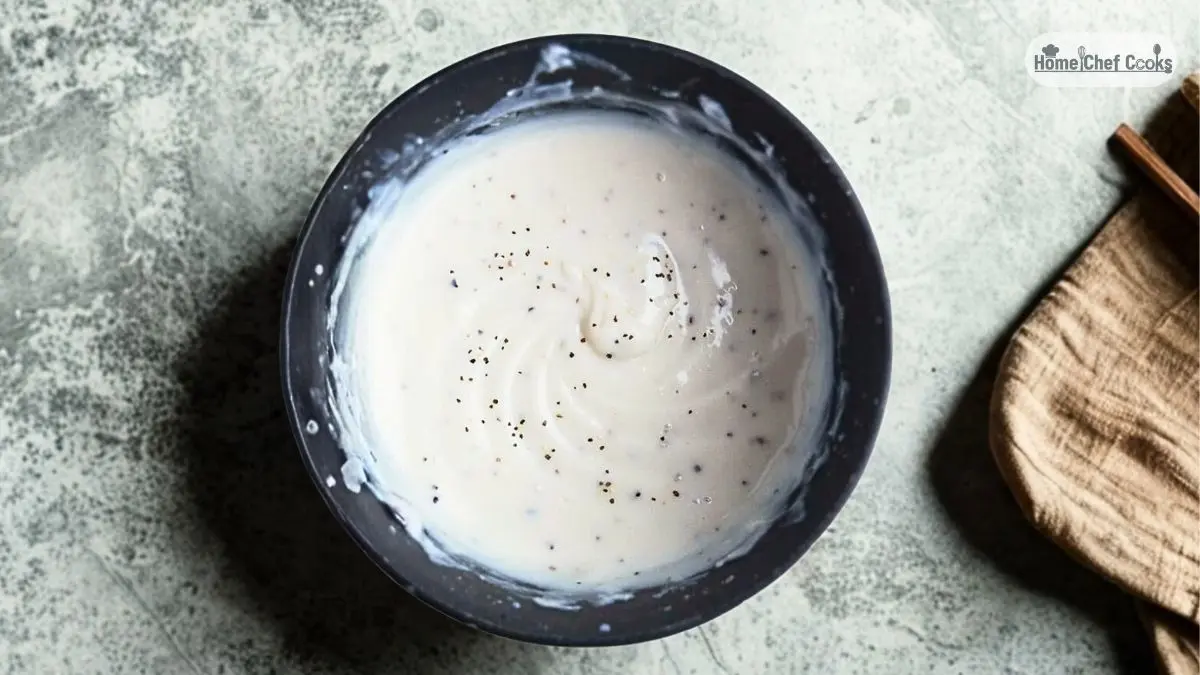
Dairy Queen gravy offers a rich, creamy flavor profile with a distinctive peppery kick that sets it apart from traditional country gravies. The bacon grease base adds a subtle smoky depth and savory complexity that makes this gravy irresistible.

It’s velvety smooth with a medium-thick consistency-not too heavy, not too thin-that coats chicken strips beautifully without overwhelming them. The balance of salt and black pepper creates a comforting, Southern-style taste that’s both nostalgic and crave-worthy.
Unlike some fast-food gravies, the DQ gravy maintains a homemade quality with real dairy richness that makes every bite memorable.
Dairy Queen Gravy Recipe Ingredients
Ingredients:
- ¼ cup bacon grease (or butter as a substitute)
- ¼ cup all-purpose flour
- 2 cups whole milk (room temperature recommended)
- ½ teaspoon salt
- ½ teaspoon black pepper (adjust to taste)
Kitchen Utensils:
- Medium saucepan
- Wire whisk
- Measuring cups and spoons
- Wooden spoon (optional)
- Small bowl (for extra milk if needed)
Preparation and Cooking Time
Prep Time: 2 minutes
Cook Time: 8 minutes
Total Time: 10 minutes
Servings: 4-6 servings (approximately 2 cups)
Dairy Queen Gravy Recipe Instructions
Step 1: Heat the Bacon Grease
Place a medium saucepan on medium-low heat. Add ¼ cup of bacon grease and let it warm up gently. The grease should be melted and shimmering but not smoking. This temperature control is crucial for preventing the flour from burning in the next step.

Step 2: Add the Flour
Slowly add ¼ cup of all-purpose flour, about a tablespoon at a time, while whisking continuously. This gradual incorporation helps the flour blend smoothly with the grease without forming clumps. Keep whisking until the mixture forms a smooth, golden paste called a roux. This should take about 1-2 minutes.

Step 3: Pour in the Milk
While whisking vigorously, slowly pour in 2 cups of whole milk in a steady stream. Room temperature milk incorporates more easily and reduces the risk of lumps. Pour gradually-rushing this step is the most common mistake when making gravy. Continue whisking as you pour to ensure a silky-smooth consistency.

Step 4: Season It
Add ½ teaspoon of salt and ½ teaspoon of black pepper to the mixture. Whisk thoroughly to distribute the seasonings evenly throughout the gravy. The pepper should be visible throughout, giving that signature speckled appearance that Dairy Queen gravy is known for.

Step 5: Cook Until Thickened
Maintain medium heat and continue whisking every few seconds to prevent sticking or burning on the bottom. In approximately 5 minutes, the gravy will begin to thicken noticeably. Watch for the consistency to change-you want it to reach the point just before it starts to simmer with small bubbles forming around the edges. If large bubbles appear or it begins to boil, reduce the heat immediately to prevent scorching.

Step 6: Let it Cool a Bit
Remove the saucepan from heat. The gravy will continue to thicken as it cools slightly due to the starch in the flour. If your DQ gravy becomes too thick for your preference, simply stir in milk one tablespoon at a time until you reach your desired consistency.

Customization and Pairing Ideas for Serving
1. Classic Chicken Strip Dipping
Serve your copycat Dairy Queen gravy recipe exactly as DQ does-alongside crispy chicken tenders or strips. The creamy, peppery gravy contrasts beautifully with crunchy breading, creating the authentic fast-food experience at home.
2. Loaded Fries or Poutine Style
Transform ordinary french fries into a decadent treat by smothering them with this gravy. Add cheese curds for a DQ-inspired poutine, or top with shredded cheddar, bacon bits, and green onions for loaded fries that rival any restaurant.
3. Biscuits and Gravy Breakfast
Pour this rich gravy over warm, fluffy buttermilk biscuits for a Southern-style breakfast. Add crumbled breakfast sausage directly into the gravy for extra heartiness, or serve alongside scrambled eggs and hash browns for a complete morning meal.
4. Mashed Potato Topper
Elevate your mashed potatoes by using this DQ gravy instead of traditional turkey or beef gravy. The peppery flavor profile pairs wonderfully with garlic mashed potatoes, or mac and cheese creating comfort food that’s perfect for weeknight dinners or holiday sides.
5. Open-Faced Hot Sandwiches
Create restaurant-quality hot chicken or turkey sandwiches by layering sliced meat on white bread and drowning it in this creamy gravy. Add a side of cranberry sauce for a complete meal reminiscent of classic diner fare.
6. Breakfast Bowl Base
Use the gravy as a savory base for breakfast bowls featuring roasted potatoes, scrambled eggs, sausage crumbles, and shredded cheese. This hearty combination makes for a filling brunch option that satisfies even the biggest appetites.
7. Vegetable Enhancement
Pour warm gravy over roasted or steamed vegetables like green beans, cauliflower, or broccoli to make them more appealing, especially for picky eaters. The rich, familiar flavor can transform simple vegetables into a dish everyone will enjoy.

Essential Tips for Perfect DQ Gravy
1. Choose Quality Bacon Grease
The flavor foundation of this Dairy Queen gravy recipe starts with good bacon grease. Save grease from thick-cut, quality bacon for the best smoky flavor. Strain it through a fine-mesh sieve to remove any burnt bits that could make your gravy bitter or gritty. If using butter as a substitute, consider adding ¼ teaspoon of liquid smoke to mimic that subtle bacon flavor DQ fans love.
2. Master the Roux Technique
The roux (flour and fat mixture) is critical for proper thickness and flavor development. Cook your roux for at least 1-2 minutes while whisking constantly, but don’t let it brown too much-you want a blonde roux, not a dark one. This cooking time eliminates the raw flour taste while creating the thickening power you need. Under-cooked roux results in gravy that tastes pasty and starchy.
3. Temperature Matters for Milk
Using room temperature milk prevents temperature shock when you add it to the hot roux, which can cause lumping. Take your milk out of the refrigerator 30 minutes before cooking, or gently warm it in the microwave for 20-30 seconds. Cold milk hitting hot fat can seize up and create stubborn lumps that are difficult to whisk out, ruining the silky texture that makes DQ gravy so special.
4. Whisk Constantly and Confidently
Vigorous, continuous whisking is your best defense against lumps when making any gravy. Don’t be timid-use strong, sweeping motions that reach into the corners of your saucepan where flour tends to hide and clump. The more you whisk, especially during the milk-adding phase, the smoother your final product will be. If you do get a few small lumps, don’t panic-you can strain the gravy through a fine-mesh sieve before serving.
5. Adjust Consistency to Your Preference
Remember that gravy continues to thicken as it cools, so what looks perfect in the pan might be too thick when you serve it. For dipping chicken strips, aim for a consistency similar to heavy cream. For pouring over biscuits or mashed potatoes, you might want it slightly thinner. Always keep extra milk nearby to thin it out if needed-add just a tablespoon at a time while whisking until you reach your ideal consistency.
6. Season Gradually and Taste
While this recipe calls for ½ teaspoon each of salt and pepper, your bacon grease might already contain salt, and personal preferences vary. Start with the recommended amounts, then taste your gravy before serving. You can always add more seasoning, but you can’t take it away. For extra depth, consider adding a pinch of garlic powder, onion powder, or a dash of cayenne pepper for heat. Some copycat DQ gravy enthusiasts swear by a tiny pinch of MSG to recreate that addictive fast-food flavor.
7. Prevent Skin Formation
If you’re not serving your how to make Dairy Queen gravy immediately, press a piece of plastic wrap directly onto the surface of the gravy to prevent a skin from forming as it cools. This skin happens when moisture evaporates from the top layer. Alternatively, place a small pat of butter on top, which will melt and create a protective layer. When ready to serve, simply whisk the butter back into the gravy for added richness and restore that silky, smooth texture.
Storage and Reheating Guidance
Store leftover Dairy Queen gravy in an airtight container in the refrigerator for up to 3-4 days. Reheat gently in a saucepan over low heat, whisking frequently and adding milk by the tablespoon to restore the creamy consistency. Microwave reheating works too-use 30-second intervals, stirring between each, until warmed through.
Dairy Queen Gravy Recipe
Ingredients
Equipment
Method
- Place a medium saucepan on medium-low heat. Add ¼ cup of bacon grease and let it warm up gently. The grease should be melted and shimmering but not smoking. This temperature control is crucial for preventing the flour from burning in the next step.
- Slowly add ¼ cup of all-purpose flour, about a tablespoon at a time, while whisking continuously. This gradual incorporation helps the flour blend smoothly with the grease without forming clumps. Keep whisking until the mixture forms a smooth, golden paste called a roux. This should take about 1-2 minutes.
- While whisking vigorously, slowly pour in 2 cups of whole milk in a steady stream. Room temperature milk incorporates more easily and reduces the risk of lumps. Pour gradually-rushing this step is the most common mistake when making gravy. Continue whisking as you pour to ensure a silky-smooth consistency.
- Add ½ teaspoon of salt and ½ teaspoon of black pepper to the mixture. Whisk thoroughly to distribute the seasonings evenly throughout the gravy. The pepper should be visible throughout, giving that signature speckled appearance that Dairy Queen gravy is known for.
- Maintain medium heat and continue whisking every few seconds to prevent sticking or burning on the bottom. In approximately 5 minutes, the gravy will begin to thicken noticeably. Watch for the consistency to change-you want it to reach the point just before it starts to simmer with small bubbles forming around the edges. If large bubbles appear or it begins to boil, reduce the heat immediately to prevent scorching.
- Remove the saucepan from heat. The gravy will continue to thicken as it cools slightly due to the starch in the flour. If your DQ gravy becomes too thick for your preference, simply stir in milk one tablespoon at a time until you reach your desired consistency.
Video
Notes
Common Queries and FAQs
We’re here to help! Below, you’ll find answers to common questions people usually have about this recipe.
Can I make DQ gravy without bacon grease?
Absolutely! Butter is an excellent substitute that still creates delicious, creamy gravy. Use ¼ cup of unsalted butter in place of bacon grease. While you’ll lose the subtle smoky flavor, the gravy will still be rich and savory. For a closer match, add ¼ teaspoon of liquid smoke or cook a strip of bacon in the pan first, remove it, and use the butter in the rendered fat.
Why is my Dairy Queen gravy lumpy?
Lumps typically form when flour isn’t properly incorporated into the fat, or when cold milk is added too quickly to the hot roux. To prevent this, always add flour gradually while whisking constantly, and ensure your milk is at room temperature. If you do get lumps, pour the gravy through a fine-mesh strainer into another pan, or use an immersion blender to smooth it out.
How can I make my gravy thicker or thinner?
If your DQ gravy is too thin, create a slurry by mixing 1 tablespoon of flour with 2 tablespoons of cold milk, then whisk it into the simmering gravy. Cook for 2-3 more minutes to thicken. If it’s too thick, simply whisk in additional milk one tablespoon at a time until you reach your desired consistency. Remember that gravy thickens as it cools.
Can I freeze Dairy Queen gravy?
While you can freeze this gravy for up to 2 months in a freezer-safe container, cream-based gravies sometimes separate when thawed. To restore the texture, thaw overnight in the refrigerator, then reheat gently while whisking vigorously. You may need to add a splash of milk and use an immersion blender to re-emulsify the gravy back to its smooth consistency.
What’s the secret to making it taste exactly like DQ?
The key is using bacon grease for that subtle smoky undertone and being generous with freshly cracked black pepper. Some fans believe DQ uses a touch of white pepper along with black pepper for complexity. The ratio of fat to flour to milk is also crucial-don’t skimp on the bacon grease or you’ll lose that rich, indulgent mouthfeel that makes the restaurant version so addictive.
Can I make this gravy ahead of time?
Yes! Make the copycat Dairy Queen gravy recipe up to 2 days ahead and store it in the refrigerator. When ready to serve, reheat slowly over medium-low heat, whisking constantly. The gravy will have thickened considerably, so have extra milk ready to add until you achieve the right pouring or dipping consistency. Fresh gravy tastes best, but advance preparation works well for meal prep.
What can I use instead of whole milk?
Whole milk is recommended for the richest, creamiest results that most closely match Dairy Queen gravy, but 2% milk works in a pinch with slightly less richness. Avoid skim milk as it will produce thin, watery gravy. For a dairy-free version, try unsweetened oat milk or cashew milk, which have enough body to create proper thickness. Non-dairy milks may slightly alter the flavor profile but can still produce satisfying results.
This copycat Dairy Queen gravy recipe brings the beloved fast-food favorite right into your kitchen with minimal effort and maximum flavor.
Whether you’re dipping crispy chicken strips, smothering fluffy biscuits, or elevating your weeknight mashed potatoes, this rich and peppery gravy delivers that signature DQ taste everyone craves.
With simple ingredients and straightforward techniques, you can enjoy restaurant-quality DQ gravy whenever the craving strikes-no drive-through necessary.
We’d love to hear how this recipe turns out for you! Give it a try, then drop a comment below to share your thoughts and tips with us.
looks yummy
Thanks Ana
I’ve been addicted to Dairy Queen’s white gravy with chicken strips since I first tried it.