
Let’s be real for a second. The phrase “healthy dessert” used to make me break out in a cold sweat. I’d picture sad, chalky cookies or flavorless fruit cups pretending to be a party in my mouth.
Hard pass, right? But after years of experimenting in my own kitchen—and trust me, there were some epic fails—I’ve cracked the code. You can absolutely have your cake (or mousse, or brownie) and eat it too, without a sugar crash or a side of guilt.
I’m not talking about deprivation. I’m talking about smart swaps, whole ingredients, and flavors so good you’ll forget they’re packed with good stuff.
Whether you’re watching your sugar, going gluten-free, or just want to feel a little less blah after dessert, I’ve got you covered. These are my go-to, tried-and-true, “wow, this is healthy?!” recipes. So, grab your apron (or don’t, I won’t judge), and let’s make some magic.
1. No-Fuss Greek Yogurt Berry Cheesecake Cups
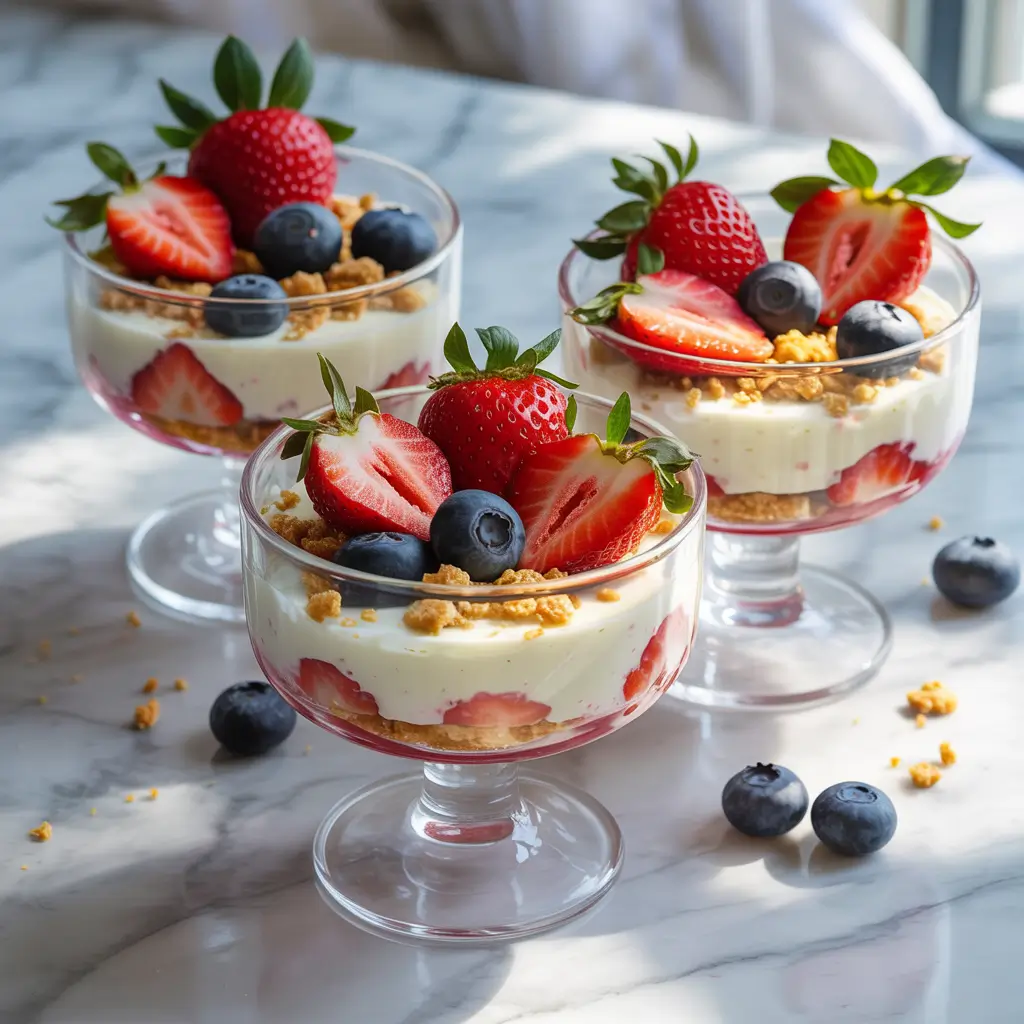
Craving cheesecake but not the 3-hour bake time and inevitable food coma? These little cups are your new best friend. They’re creamy, tangy, and come together in about 10 minutes flat. The secret weapon? Thick Greek yogurt mimics that rich cheesecake texture without all the heavy cream cheese.
Prep Time: 10 minutes
Cook Time: 0 minutes (Chill for 1 hour minimum)
Serves: 2
Ingredients & Equipment
- For the base: 1/2 cup rolled oats, 2 tbsp almond butter, 1 tsp maple syrup, pinch of salt.
- For the filling: 1 cup plain, full-fat Greek yogurt, 1 tbsp maple syrup, 1/2 tsp vanilla extract.
- For the topping: 1/2 cup mixed berries (fresh or frozen).
- Equipment: Two small jars or glasses, a small bowl, a spoon.
Instructions & Notes
- Make the base: In your small bowl, mix the oats, almond butter, maple syrup, and salt until it forms a crumbly, slightly sticky mixture. Press half of it into the bottom of each jar.
- Whip the filling: In the same bowl (less dishes!), stir the Greek yogurt, maple syrup, and vanilla until smooth. Spoon this evenly over your oat bases.
- Top & chill: Pile the berries on top. Now comes the hard part: patience. Pop them in the fridge for at least an hour so the flavors meld and the base softens slightly.
My Note: IMO, these taste even better the next day. The oats become perfectly cake-like. For a firmer “cheesecake,” use cream cheese instead of yogurt—still way healthier than the original! 🙂
2. Decadent No-Bake Avocado Chocolate Mousse

Okay, stay with me. I know avocado in a dessert sounds like a hipster prank, but this is legitimately the creamiest, richest chocolate mousse I’ve ever made. The avocado provides all the luxurious fat and texture, and you literally cannot taste it. It’s my secret weapon for impressing dinner guests who then demand the recipe.
Prep Time: 5 minutes
Cook Time: 0 minutes
Serves: 2
Ingredients & Equipment
- 1 large, ripe avocado
- 1/4 cup unsweetened cocoa powder
- 3-4 tbsp maple syrup (adjust to your sweet tooth)
- 1/4 cup almond milk
- 1 tsp vanilla extract
- Pinch of salt
- Equipment: Food processor or blender, spatula, serving bowls.
Instructions & Notes
- Blend it all: Toss the avocado flesh, cocoa powder, 3 tbsp maple syrup, almond milk, vanilla, and salt into your food processor. Blend until completely smooth and silky, scraping down the sides as needed.
- Taste & adjust: Give it a taste. Need it sweeter? Add the last tbsp of maple syrup. Too thick? A tiny splash more milk.
- Chill & serve: Divide into bowls and chill for 30 minutes to firm up slightly. Top with raspberries or a sprinkle of flaky sea salt.
Personal Take: This is my “I need chocolate NOW” dessert. The healthy fats keep you full, so you won’t devour the whole batch in one sitting. Probably. Don’t skip the salt—it’s a game-changer.
3. Banana Oatmeal Protein Cookies
These aren’t your grandma’s oatmeal cookies (sorry, Nana). They’re soft, chewy, packed with protein, and naturally sweetened with banana. They’re perfect for a post-workout snack, a breakfast on-the-go, or a 3 PM slump-buster. Ever wondered why most “healthy” cookies taste like cardboard? It’s because they forget the most important ingredient: flavor.
Prep Time: 10 minutes
Cook Time: 12-15 minutes
Makes: 8-10 cookies
Ingredients & Equipment
- 2 ripe bananas, mashed
- 1.5 cups rolled oats
- 1 scoop vanilla or unflavored protein powder (optional, but great for a boost)
- 1/4 cup dark chocolate chips or chopped nuts
- 1 tsp cinnamon
- 1/2 tsp vanilla extract
- Equipment: Baking sheet, parchment paper, mixing bowl, fork.
Instructions & Notes
- Preheat & mash: Heat your oven to 350°F (175°C). Line a baking sheet with parchment. In the bowl, mash the bananas until mostly smooth.
- Mix & scoop: Stir in the oats, protein powder (if using), cinnamon, and vanilla. Fold in the chocolate chips. The dough will be wet and sticky. Use a spoon to drop mounds onto the sheet, flattening them slightly.
- Bake & cool: Bake for 12-15 minutes until the edges are golden. Let them cool completely on the sheet—they firm up as they cool.
Key Point: The riper the banana, the sweeter the cookie. I use bananas with lots of brown spots. These keep in the fridge for a week, making them ideal for meal prep.
Also Read: 10 Delicious Easy Dessert Recipes Sweet Treat Ideas
4. Almond Flour Chocolate Lava Cake
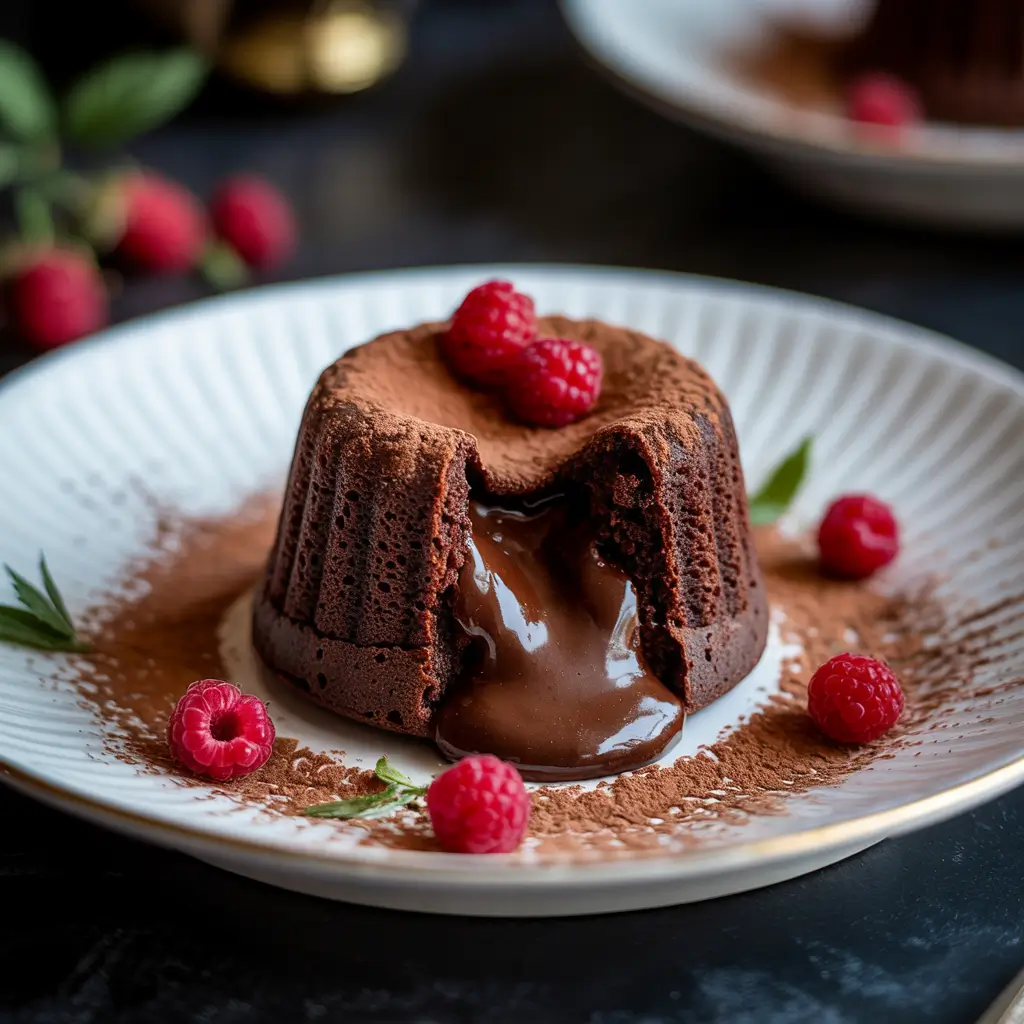
Feeling fancy? This single-serve lava cake is gluten-free, low-carb, and feels like a total indulgence. The center stays gloriously molten, and the almond flour gives it a tender, nutty crumb. It’s my go-to for a “special occasion” dessert that takes 20 minutes start to finish.
Prep Time: 5 minutes
Cook Time: 12-14 minutes
Serves: 1
Ingredients & Equipment
- 1 tbsp coconut oil, melted + extra for greasing
- 1 large egg
- 2 tbsp almond flour
- 1 tbsp unsweetened cocoa powder
- 1.5 tbsp maple syrup or honey
- 1/4 tsp baking powder
- Pinch of salt
- Equipment: One 6-oz ramekin, small bowl, whisk.
Instructions & Notes
- Prep: Preheat oven to 375°F (190°C). Grease your ramekin with a little coconut oil.
- Whisk the wet: In the bowl, whisk the egg and melted coconut oil until combined. Add the maple syrup and whisk again.
- Combine the dry: Add the almond flour, cocoa powder, baking powder, and salt. Whisk until just combined—don’t overmix!
- Bake: Pour into the ramekin and bake for 12-14 minutes. The top should be set, but the center will jiggle. Let it cool for 1 minute, then run a knife around the edge and invert onto a plate.
Warning: The ramekin will be hot! The lava flow is best when you serve it immediately. It’s a bit of a science experiment, but a delicious one.
5. Chia Seed Coconut Pudding Parfait
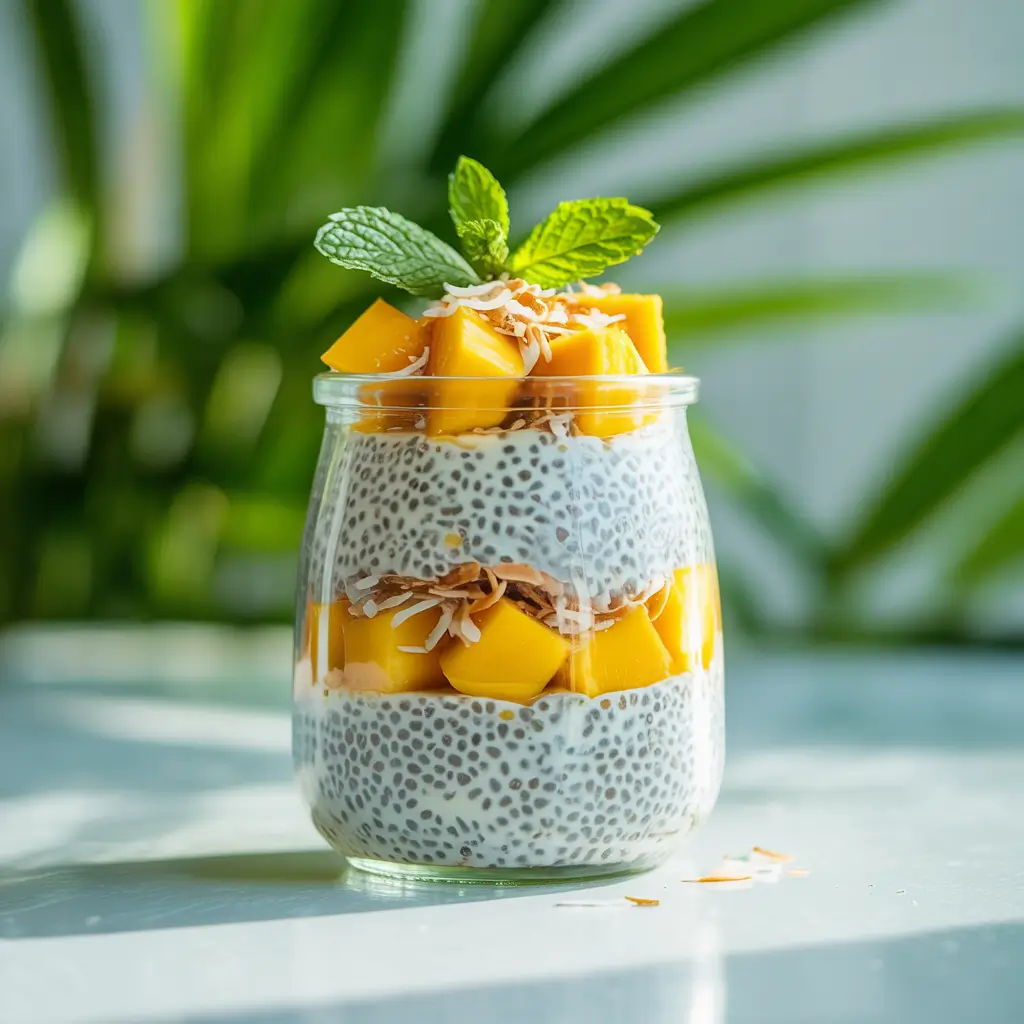
This is the ultimate make-ahead breakfast or dessert. It’s like a tropical vacation in a glass. The chia seeds create a thick, tapioca-like pudding, and layering it with coconut yogurt and mango makes it feel way more decadent than it is.
Prep Time: 5 minutes + overnight chill
Cook Time: 0 minutes
Serves: 1
Ingredients & Equipment
- 3 tbsp chia seeds
- 1 cup coconut milk (from a carton, not a can)
- 1 tsp maple syrup or a drop of vanilla stevia
- 1/2 cup coconut yogurt
- 1/4 cup diced mango (fresh or frozen/thawed)
- 2 tbsp toasted coconut flakes
- Equipment: Jar or glass, spoon.
Instructions & Notes
- Make the pudding: The night before, stir the chia seeds, coconut milk, and sweetener in a jar. Cover and refrigerate overnight, giving it a shake after 30 minutes to prevent clumps.
- Assemble the parfait: In the morning, or when ready for dessert, give the chia pudding a good stir. In your serving glass, layer: half the chia pudding, all the coconut yogurt, the remaining chia pudding, and top with mango and toasted coconut.
FYI: The texture of chia pudding isn’t for everyone. If you’re new to it, start with 2 tbsp chia seeds for a thinner pudding. This parfait is all about the textures and the crunch from the coconut—don’t skip it!
6. Keto Peanut Butter Fudge Bites
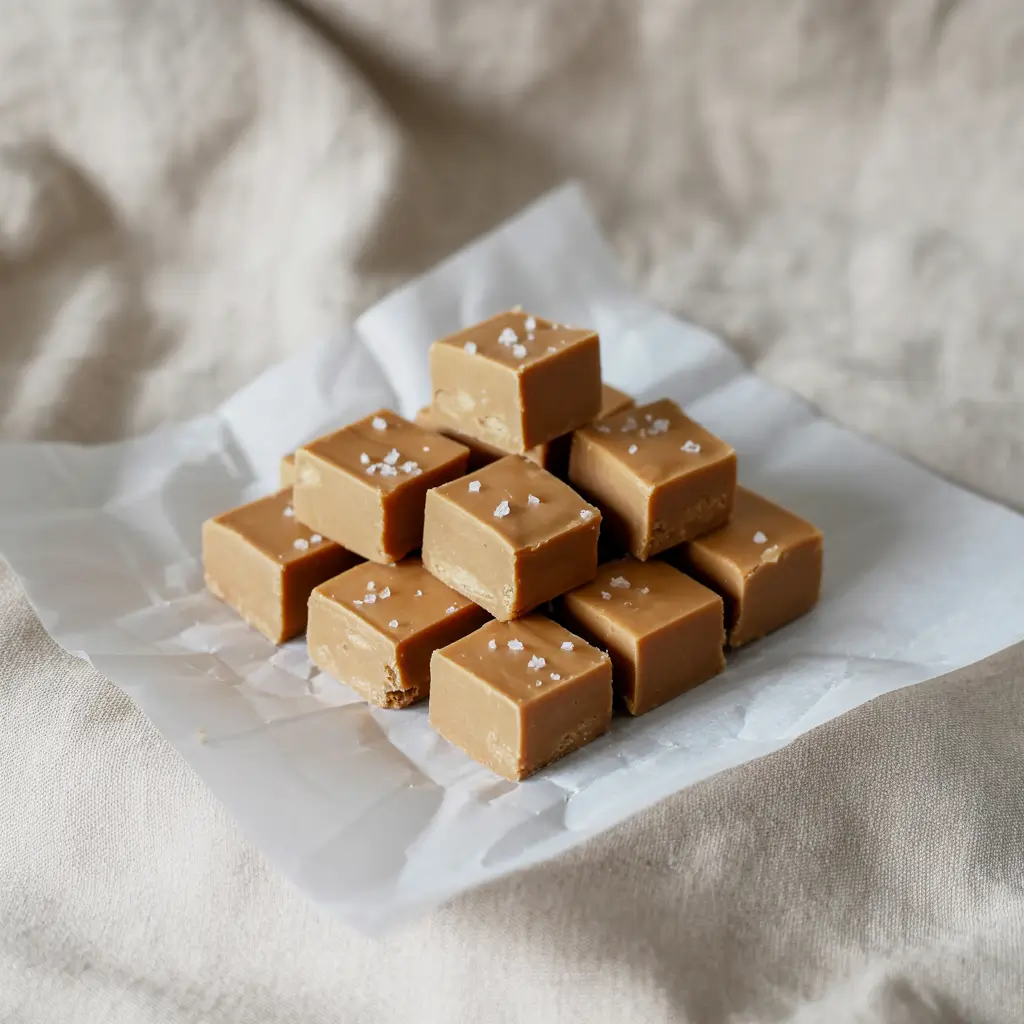
Three. Ingredients. That’s it. These little bites are creamy, peanuty, and satisfy a sweet craving with almost zero effort. They’re perfect for the keto crowd, but honestly, they’re just perfect for anyone who loves peanut butter. Which, let’s be honest, is everyone.
Prep Time: 5 minutes + 1 hour freeze
Cook Time: 0 minutes
Makes: 12 bites
Ingredients & Equipment
- 1 cup natural, creamy peanut butter (no sugar added)
- 1/4 cup coconut oil, melted
- 2 tbsp powdered erythritol or monk fruit sweetener (or to taste)
- Equipment: Mini muffin tin, mini muffin liners, microwave-safe bowl, spoon.
Instructions & Notes
- Mix: In the microwave-safe bowl, gently melt the peanut butter and coconut oil together if your peanut butter is stiff. Stir until smooth. Stir in the powdered sweetener until fully dissolved.
- Pour & freeze: Line your mini muffin tin with liners. Pour the mixture evenly into the liners. Freeze for at least 1 hour until solid.
- Store: Pop them out of the tin and store in a sealed container in the freezer. Let them sit at room temp for 2-3 minutes before eating for the best fudgy texture.
Heads up: Use natural peanut butter where the oil separates—this recipe works because of that perfect ratio. The commercial, sugary kind won’t set the same way.
Also Read; 10 Irresistible Dessert Recipes Sweet Heaven Ideas
7. Apple Cinnamon Oat Crumble Cups
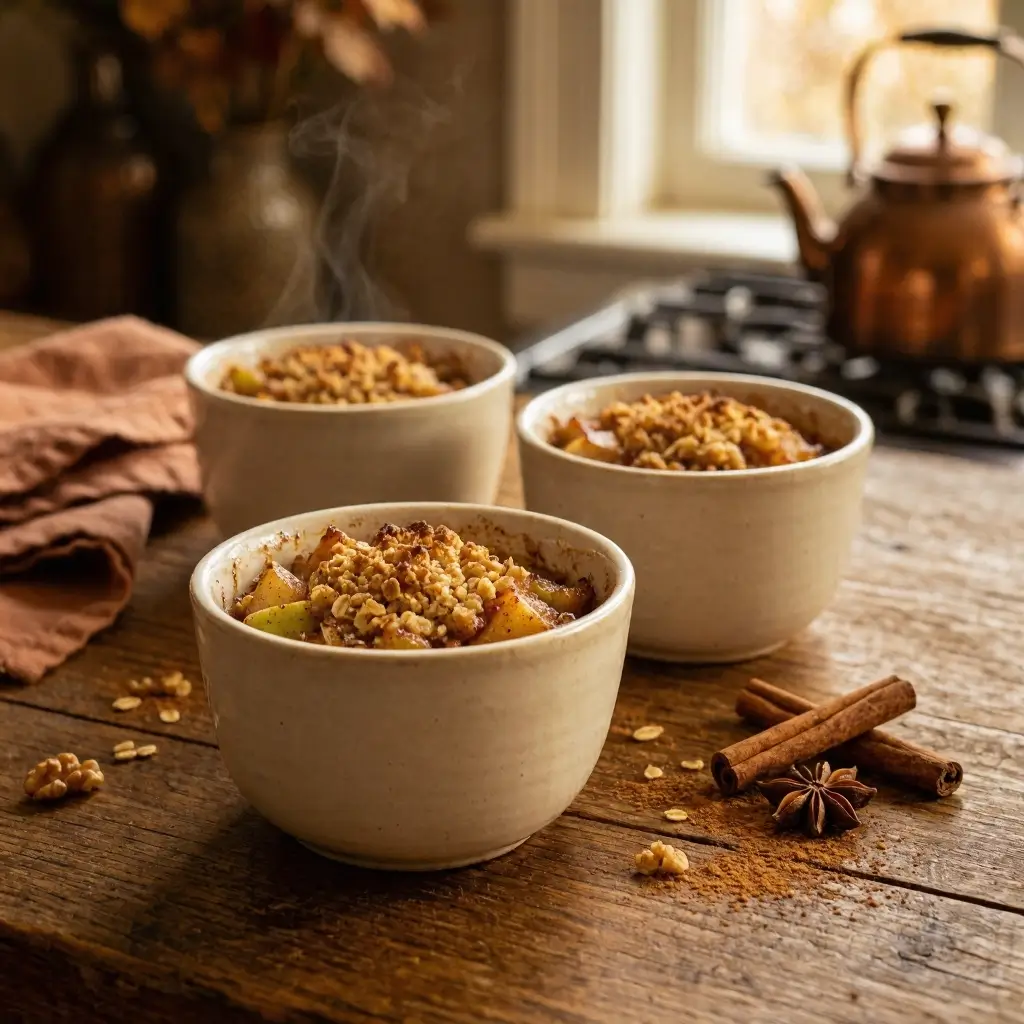
All the cozy vibes of apple crumble, but in a single-serve, portion-controlled cup. The apples get soft and jammy, and the oat topping gets perfectly crunchy. It’s like a hug in dessert form, and it makes your kitchen smell insane.
Prep Time: 10 minutes
Cook Time: 20-25 minutes
Serves: 2
Ingredients & Equipment
- For the filling: 1 medium apple (like Honeycrisp or Granny Smith), peeled and diced, 1 tsp lemon juice, 1/2 tsp cinnamon.
- For the crumble: 1/3 cup rolled oats, 2 tbsp almond flour, 1 tbsp coconut oil (solid), 1 tbsp maple syrup, 1/2 tsp cinnamon, pinch of salt.
- Equipment: Two 8-oz ramekins, mixing bowl, fork.
Instructions & Notes
- Prep & fill: Preheat oven to 350°F (175°C). Toss the diced apple with lemon juice and cinnamon. Divide evenly between the ramekins.
- Make the crumble: In the bowl, mix oats, almond flour, cinnamon, and salt. Add the solid coconut oil and maple syrup. Use your fork or fingers to work it together until it forms clumps. Sprinkle this over the apples.
- Bake: Place ramekins on a baking sheet (to catch drips) and bake for 20-25 minutes until the topping is golden and the apples are bubbling.
Best Served: Warm! A tiny scoop of vanilla frozen yogurt on top is not cheating, it’s living your best life.
8. Healthy Dark Chocolate Energy Truffles
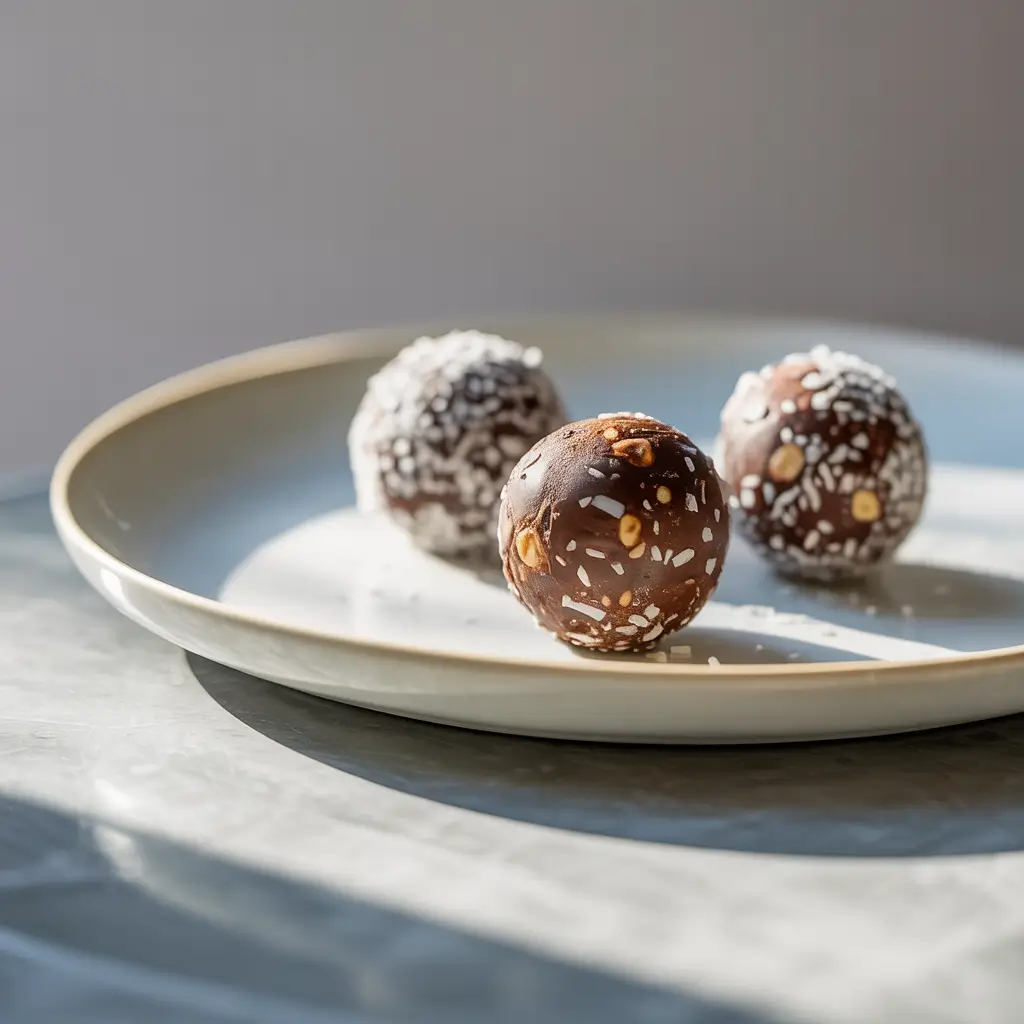
These are not your average dessert truffles. They’re packed with dates, nuts, and seeds for real, sustained energy. They taste like a brownie bite but act like a power snack. I make a double batch and keep them in the freezer for whenever a craving hits.
Prep Time: 15 minutes
Cook Time: 0 minutes
Makes: 12 truffles
Ingredients & Equipment
- 1 cup pitted Medjool dates (about 10)
- 1/2 cup raw almonds or walnuts
- 3 tbsp unsweetened cocoa powder
- 1 tbsp chia seeds or ground flaxseed
- 1 tbsp almond butter
- Pinch of salt
- For rolling: Extra cocoa powder, crushed nuts, or shredded coconut.
- Equipment: Food processor, spatula, small bowl.
Instructions & Notes
- Process: If your dates are dry, soak them in hot water for 10 minutes first. Drain. Add dates, nuts, cocoa powder, seeds, almond butter, and salt to the food processor. Pulse until the mixture sticks together when pinched.
- Roll: Scoop out tablespoon-sized portions and roll into balls. If the mixture is too sticky, wet your hands slightly.
- Coat & chill: Roll the balls in your chosen coating. Place on a parchment-lined plate and chill for 30 minutes to firm up.
Stash Them: They last for weeks in the fridge or months in the freezer. They’re a lifesaver for hiking trips or late-night study sessions.
9. Low-Sugar Mango Coconut Ice Cream
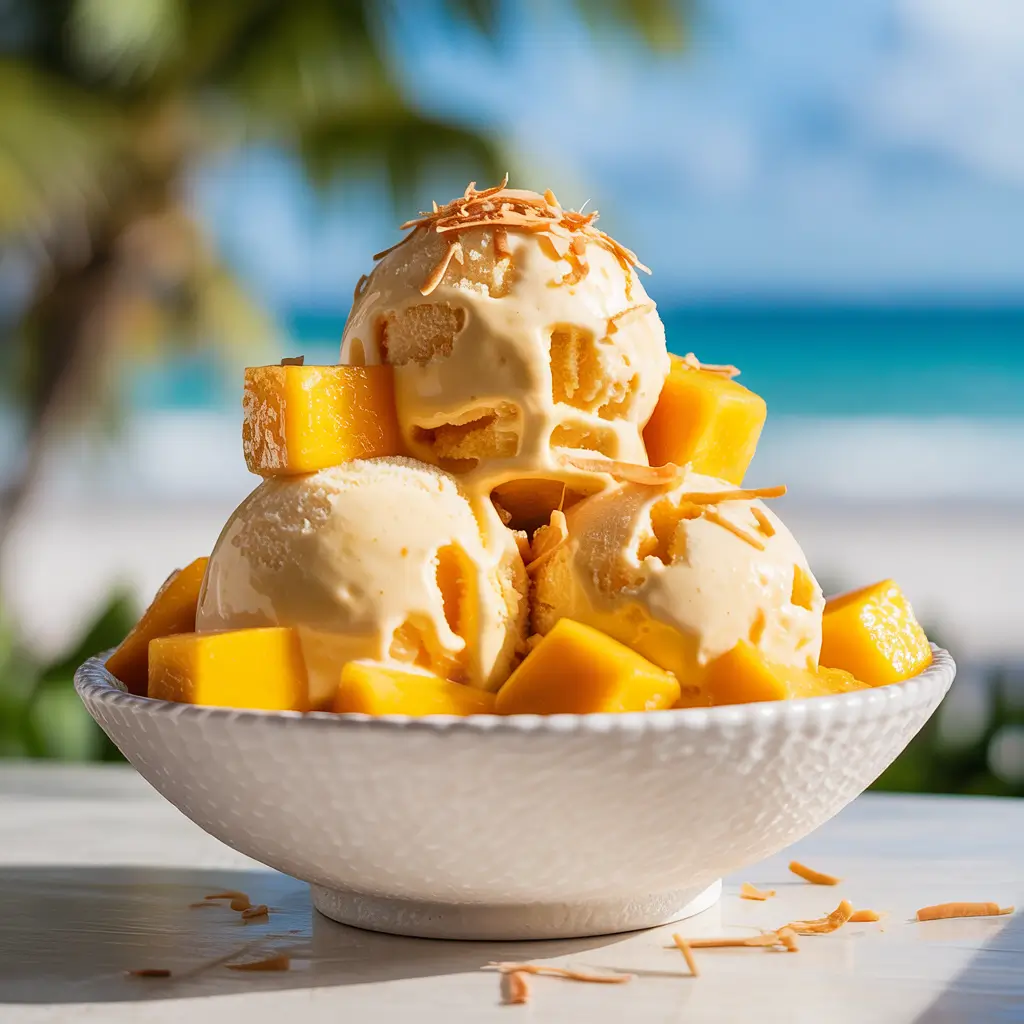
Ice cream maker not required! This “nice cream” uses frozen mango and coconut milk for a creamy, dreamy, naturally sweet treat. It’s bright, refreshing, and you can eat the whole batch without a shred of remorse. Seriously, what’s not to love?
Prep Time: 5 minutes + freeze time for mango
Cook Time: 0 minutes (Blending time only)
Serves: 2
Ingredients & Equipment
- 3 cups frozen mango chunks
- 1/2 cup full-fat coconut milk (from a can for creaminess)
- 1 tbsp lime juice (optional, but it brightens everything up)
- Equipment: High-speed blender or food processor, spatula.
Instructions & Notes
- Blend: Let the frozen mango sit out for 5 minutes to slightly thaw. Add it to your blender with the coconut milk and lime juice. Blend, stopping to scrape down the sides, until it reaches a soft-serve consistency.
- Serve or freeze: Eat it immediately for a soft-serve texture. For scoopable ice cream, transfer to a loaf pan, freeze for 1-2 hours, then scoop.
Texture Tip: High-powered blender is key here. If yours struggles, add a tiny bit more coconut milk, 1 tbsp at a time. The goal is thick and creamy, not a smoothie.
Also Read: 10 Heavenly Oreo Cookie Recipes Creamy Dessert Bliss
10. Vegan Date-Sweetened Brownie Squares
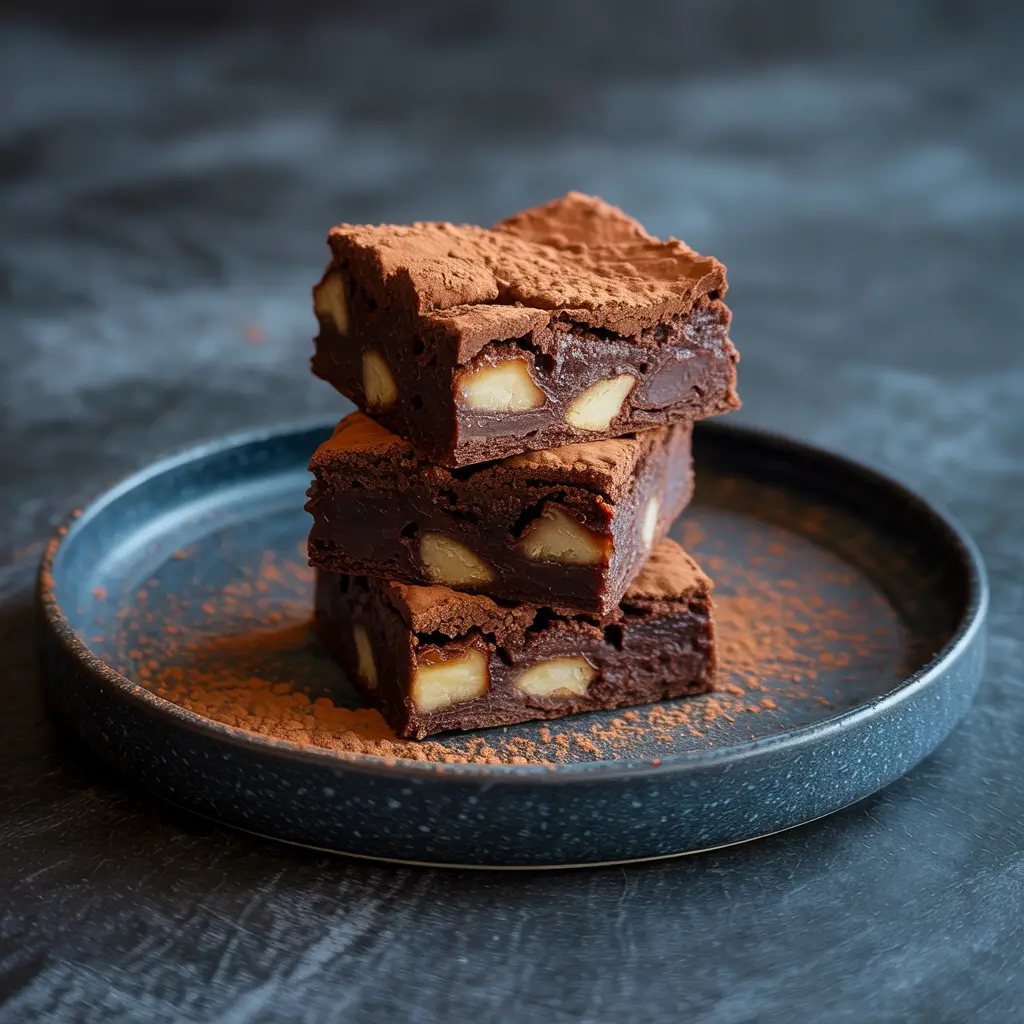
The grand finale. These brownies are fudgy, intensely chocolatey, and sweetened entirely with dates. No refined sugar, no flour, no eggs, no dairy. They sound too good to be true, but they are dangerously delicious. They’re the recipe that finally convinced my skeptical family that healthy desserts are legit.
Prep Time: 15 minutes
Cook Time: 18-22 minutes
Makes: 9 squares
Ingredients & Equipment
- 1.5 cups pitted Medjool dates (soaked if not soft)
- 1/2 cup hot water
- 1 tsp vanilla extract
- 1/2 cup almond butter
- 1/2 cup unsweetened cocoa powder
- 1/4 tsp salt
- 1/4 tsp baking soda
- 1/3 cup dark chocolate chips (vegan, if needed)
- Equipment: 8×8 inch baking pan, parchment paper, food processor, spatula.
Instructions & Notes
- Prep: Preheat oven to 350°F (175°C). Line the pan with parchment paper, leaving overhang on the sides for easy lifting.
- Make the batter: In the processor, blend dates, hot water, and vanilla until a smooth paste forms. Add almond butter and blend again. Add cocoa powder, salt, and baking soda, and blend until just combined. Fold in the chocolate chips with a spatula.
- Bake: Spread the thick batter evenly in the pan. Bake for 18-22 minutes. The top should look set and slightly dry. They will seem underdone! This is correct. Let them cool completely in the pan—this is crucial for the fudgy texture to set.
The Golden Rule: Let them cool completely. I know it’s torture, but if you cut them warm, they’ll fall apart. Once cooled, lift them out using the parchment and slice. Store in the fridge for the ultimate fudgy experience.
Final Thoughts: Ditch the Dogma
Look, at the end of the day, food is about joy. These 10 recipes aren’t about following rigid rules or feeling like you’re missing out. They’re about creativity, nourishment, and proving that “healthy” and “delicious” can absolutely live in the same sentence—or in the same bite.
So, what are you waiting for? Pick the one that made your stomach growl the loudest and give it a whirl this weekend. Your taste buds—and your body—will thank you. And if you create a genius modification, you better tell me about it! Happy, healthy baking, friends