Let’s be real for a second. Sometimes, you just need a dessert. Not a fancy, three-day-project dessert, but a “I want something incredible and I want it now” kind of dessert.
Or maybe you’ve got people coming over and you want to look like a domestic god/goddess without breaking a sweat. I’ve been there, my friend. More times than I can count.
I’ve spent years in my kitchen as a personal dessert-testing lab, and trust me, I’ve had my share of wins and… let’s call them “character-building experiences.” The recipes I’m sharing today are the champions, the tried-and-true heroes that never let me down. They’re easy, mostly quick, and guaranteed to impress.
So, grab your apron (or don’t, I won’t judge), and let’s get into some seriously good stuff.
1. Gooey Chocolate Lava Mug Cake
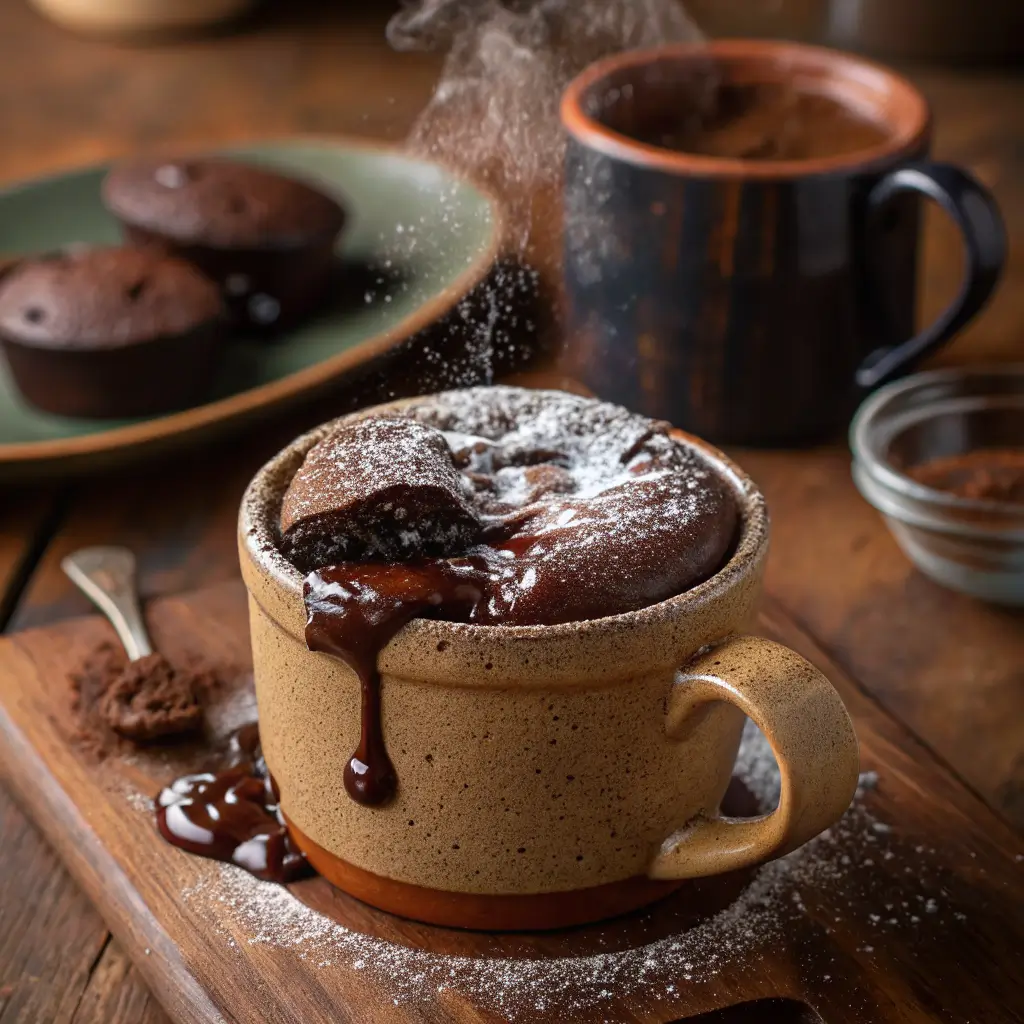
Ever have a dessert emergency? That sudden, non-negotiable craving for something warm, chocolatey, and utterly decadent? This is your 5-minute solution. It’s magic in a mug, IMO.
The Rundown
- Prep Time: 5 minutes
- Cook Time: 1-2 minutes
- Serves: 1 very happy person
What You’ll Need
- Equipment: A microwave-safe mug (around 12 oz), a small whisk or fork, measuring spoons.
- Ingredients:
- 3 tbsp all-purpose flour
- 2 tbsp unsweetened cocoa powder
- 3 tbsp granulated sugar
- 1/4 tsp baking powder
- Pinch of salt
- 3 tbsp milk
- 2 tbsp vegetable or canola oil
- 1 tbsp chocolate hazelnut spread (like Nutella) or a few chocolate chips for the “lava” center
Let’s Make It
- Dry Team Assemble: In your mug, whisk together the flour, cocoa powder, sugar, baking powder, and salt. Get rid of any lumps—nobody wants a powdery bite.
- Wet Team Enters: Add the milk and oil. Stir vigorously until the batter is completely smooth and glossy.
- The Secret Core: Plop the spoonful of chocolate hazelnut spread right into the center of the batter. Do not stir it in. This is the key to the gooey lava center.
- Zap It: Microwave on high for 60-90 seconds. Start with 60! The cake will rise and look set on top, but the center should still be slightly soft. Overcooking is the enemy of gooeyness.
Chef’s Notes
- Variation Station: Swap the chocolate hazelnut spread for a caramel square or a spoonful of peanut butter for a different surprise inside.
- Serve Immediately! This waits for no one. The gooey factor diminishes as it cools. A scoop of vanilla ice cream on top is never a bad idea.
2. Strawberry Cheesecake Dessert Cups
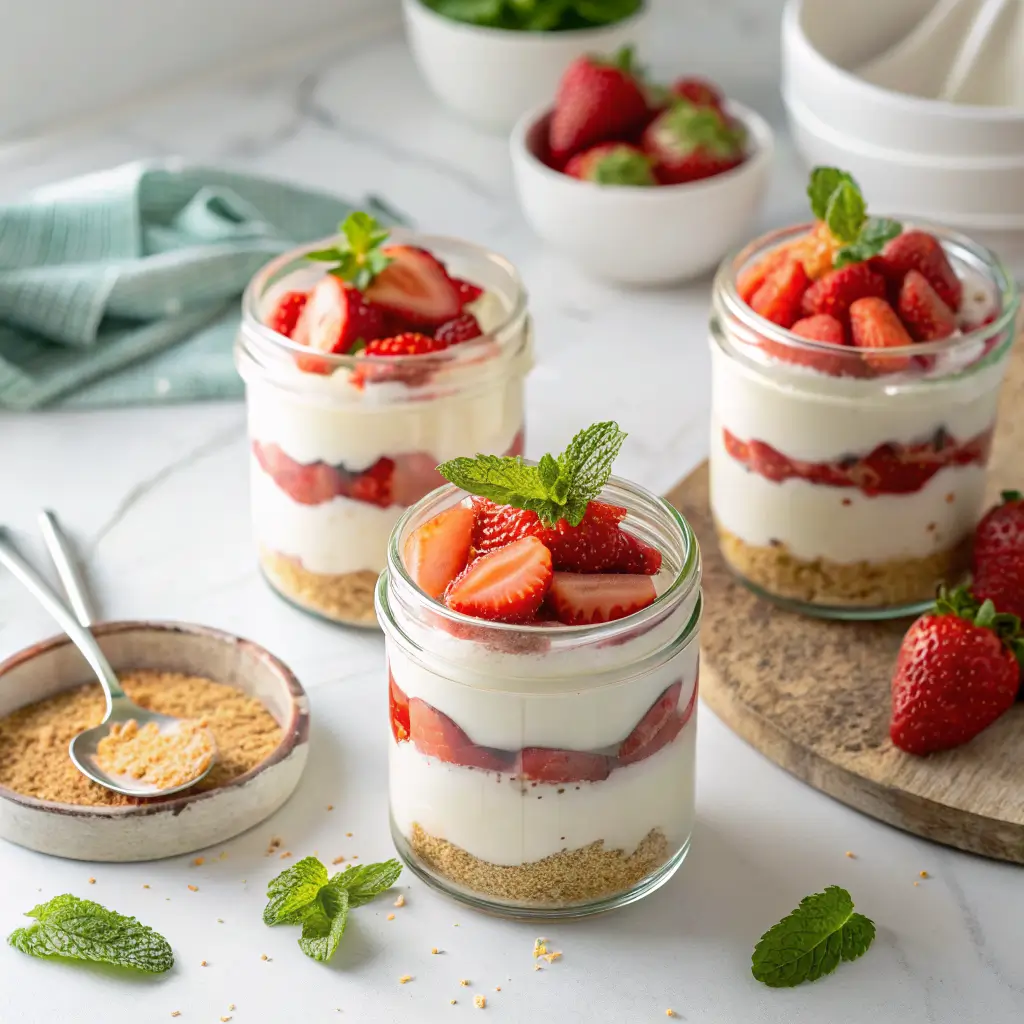
These are the ultimate “I planned this all along” dessert. They look fancy, taste incredible, and are secretly a no-bake breeze. Perfect for when you need a crowd-pleaser that’s also portion-controlled.
The Rundown
- Prep Time: 20 minutes
- Chill Time: 2 hours minimum
- Serves: 6-8 cups
What You’ll Need
- Equipment: Mixing bowls, electric hand mixer or stand mixer, 6-8 small serving cups or jars, piping bag (optional, a zip-top bag with the corner cut works!).
- Ingredients:
- Crust: 1 cup graham cracker crumbs, 3 tbsp melted butter, 1 tbsp sugar.
- Filling: 8 oz cream cheese (softened), 1 cup powdered sugar, 1 tsp vanilla extract, 1 cup heavy whipping cream.
- Topping: 1 cup fresh strawberries (diced), 2 tbsp strawberry jam (warmed).
Let’s Make It
- Crumb Base: Mix the graham cracker crumbs, melted butter, and sugar. Press a spoonful into the bottom of each cup.
- Cloud-like Filling: Beat the softened cream cheese until smooth. Gradually beat in the powdered sugar and vanilla. In a separate bowl, whip the heavy cream to stiff peaks. Gently fold the whipped cream into the cream cheese mixture until it’s all one fluffy, luscious cloud.
- Layer Up: Pipe or spoon the filling over the crusts in your cups. Smooth the tops.
- Strawberry Shine: Toss the diced strawberries with the warm jam. Spoon this glossy, beautiful mixture over the cheesecake filling.
- The Hardest Part: Chill for at least 2 hours. This lets everything set and the flavors get to know each other.
Chef’s Notes
- Crust Hack: No graham crackers? Use crushed Oreos (cream and all) for a cookies-and-cream version.
- Make Ahead: These are the perfect make-ahead dessert. They keep beautifully in the fridge for up to 2 days.
3. No-Bake Oreo Icebox Cake

If you can whip cream and open a package of cookies, you can make this showstopper. It’s a childhood dream turned into a sophisticated (but still totally fun) dessert. The cookies soften into a cake-like texture—it’s wild.
The Rundown
- Prep Time: 15 minutes
- Chill Time: 8 hours (or overnight)
- Serves: 10-12
What You’ll Need
- Equipment: 9×13 inch baking dish, mixing bowl, electric mixer.
- Ingredients:
- 2 cups heavy whipping cream
- 1/2 cup powdered sugar
- 1 tsp vanilla extract
- 16 oz cream cheese (softened)
- 1 package (approx. 36-40) Oreo cookies
- 2 cups whole milk (for dipping)
Let’s Make It
- Whip It Good: Whip the heavy cream, powdered sugar, and vanilla to stiff peaks.
- Cheesecake Fusion: In another bowl, beat the cream cheese until smooth. Gently fold in the whipped cream mixture. This is your ridiculously delicious filling.
- The Dip & Layer: Briefly dip each Oreo in milk (just a quick dunk!) and arrange a single layer in your dish. Spread a third of the cream filling over the cookies. Repeat this layering two more times, ending with a layer of cream.
- Patience, Grasshopper: Cover and refrigerate for at least 8 hours, preferably overnight. This is non-negotiable. The cookies need time to absorb moisture and transform.
Chef’s Notes
- Garnish Game: Crush a few extra Oreos and sprinkle them on top before serving for that “wow” factor.
- Flavor Twist: Use mint Oreos and add a drop of peppermint extract to the filling for a fantastic mint chocolate version.
Also Read: 10 Heavenly Oreo Cookie Recipes Creamy Dessert Bliss
4. Salted Caramel Brownie Trifle
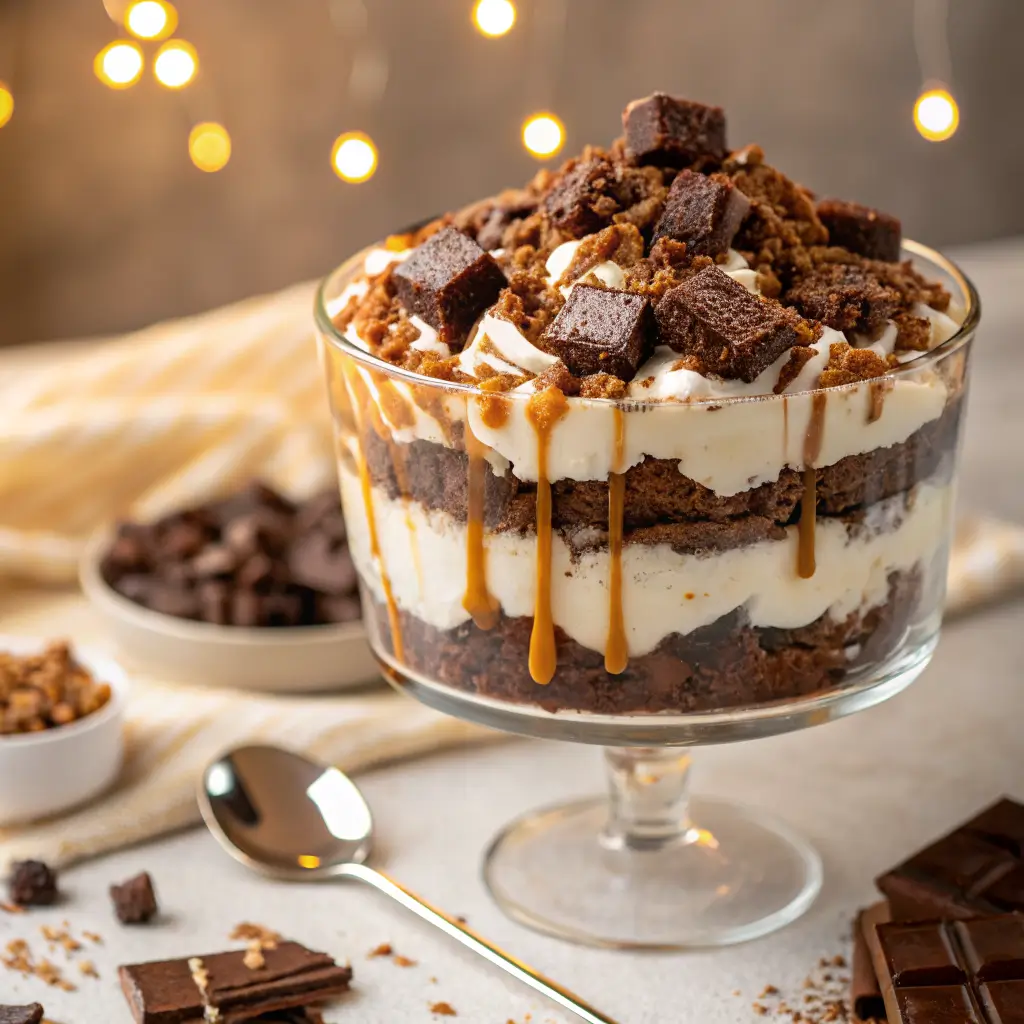
This is the dessert you make when you want to hear angels sing. It’s layers of fudgy brownie, salted caramel, whipped cream, and more caramel. It’s indulgent, messy, and absolutely perfect.
The Rundown
- Prep Time: 30 minutes (assuming brownies are baked)
- Cook Time: Per brownie mix/package
- Serves: 12-15
What You’ll Need
- Equipment: Trifle bowl or large glass bowl, mixing bowl.
- Ingredients:
- 1 batch of your favorite brownies (from a box or from scratch), baked and cooled, cut into 1-inch cubes.
- 1 cup salted caramel sauce (store-bought or homemade), plus extra for drizzle.
- 2 cups heavy whipping cream
- 1/4 cup powdered sugar
- 1 tsp vanilla extract
- Flaky sea salt for finishing
Let’s Make It
- Whip It: Whip the heavy cream, powdered sugar, and vanilla to medium-stiff peaks.
- The Grand Assembly: Start with a layer of brownie cubes in the bottom of your bowl. Drizzle generously with salted caramel sauce. Top with a thick layer of whipped cream. Repeat these layers until you run out, finishing with a final billowy layer of cream.
- The Crown Jewel: Drizzle more caramel sauce over the top and sprinkle with that magical flaky sea salt.
Chef’s Notes
- Time Saver: A good-quality store-bought caramel sauce is your best friend here. No shame in that game.
- Texture is Key: Let the brownies cool completely, or they’ll melt your whipped cream. A little patience pays off big time.
5. Mini Lemon Cream Pie Bites
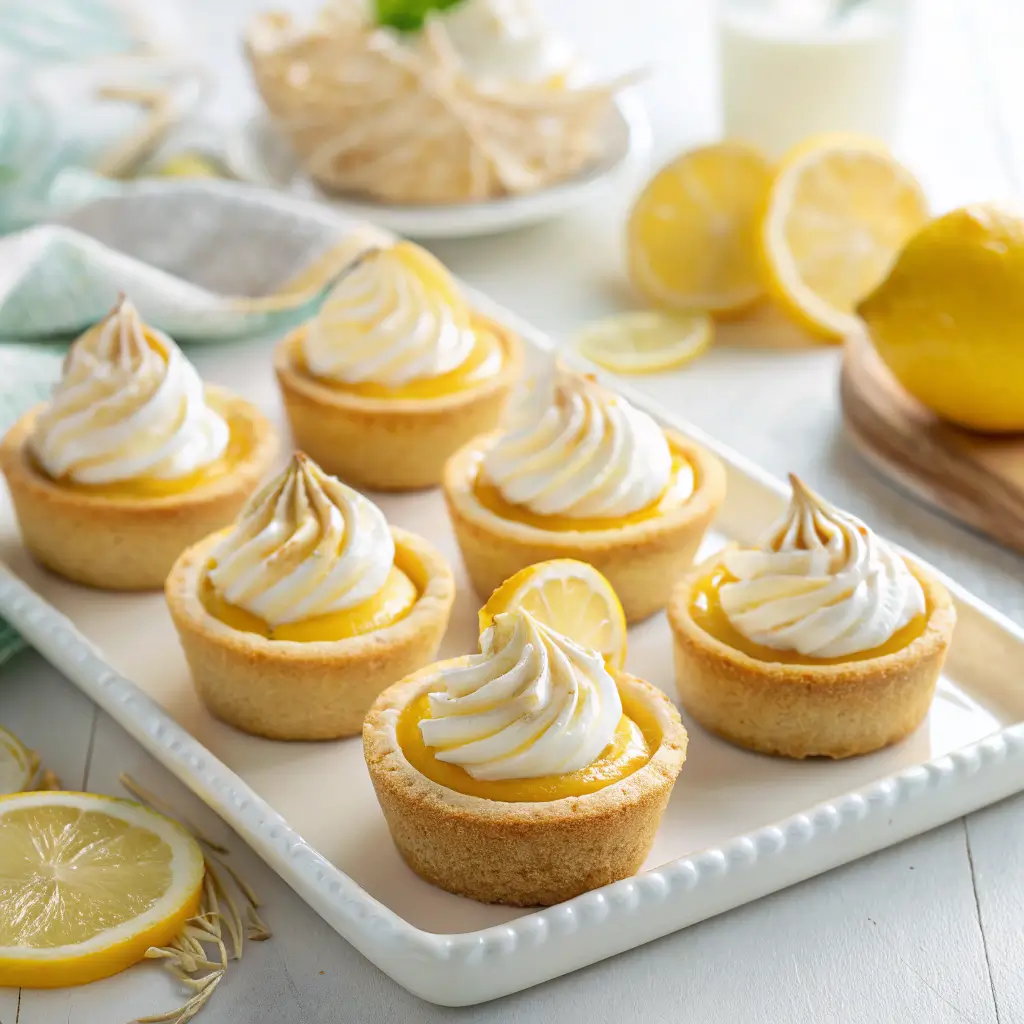
These are little rays of sunshine. Bright, tangy, and creamy, they’re the perfect bite after a heavy meal. They look adorable on a platter, and you can pop them like candy. Well, fancy candy.
The Rundown
- Prep Time: 25 minutes
- Cook Time: 10 minutes (for phyllo cups)
- Serves: 30 bites
What You’ll Need
- Equipment: Mini muffin tin, mixing bowl, electric mixer.
- Ingredients:
- 2 packages (30 count) pre-made mini phyllo cups (usually in the freezer aisle).
- 4 oz cream cheese (softened)
- 1 (14 oz) can sweetened condensed milk
- 1/2 cup fresh lemon juice (about 3 lemons)
- 1 tsp lemon zest
- 1 cup heavy whipping cream
- 2 tbsp powdered sugar
Let’s Make It
- Crunchy Base: Place phyllo cups on a baking sheet and bake according to package directions to crisp them up. Let cool.
- Luscious Filling: Beat the cream cheese until smooth. Gradually beat in the sweetened condensed milk, then the lemon juice and zest. The mixture will thicken beautifully.
- Lighten It Up: In a separate bowl, whip the cream and powdered sugar to stiff peaks. Fold it into the lemon mixture.
- Fill ‘Em Up: Pipe or spoon the lemon cream into the cooled phyllo cups. Chill until ready to serve.
Chef’s Notes
- Fresh is Best: Please, for the love of all things good, use fresh lemon juice. The bottled stuff just doesn’t compare.
- Garnish: A tiny dollop of whipped cream and a small raspberry on top makes these look professionally made.
6. Cinnamon Roll Cheesecake Bars
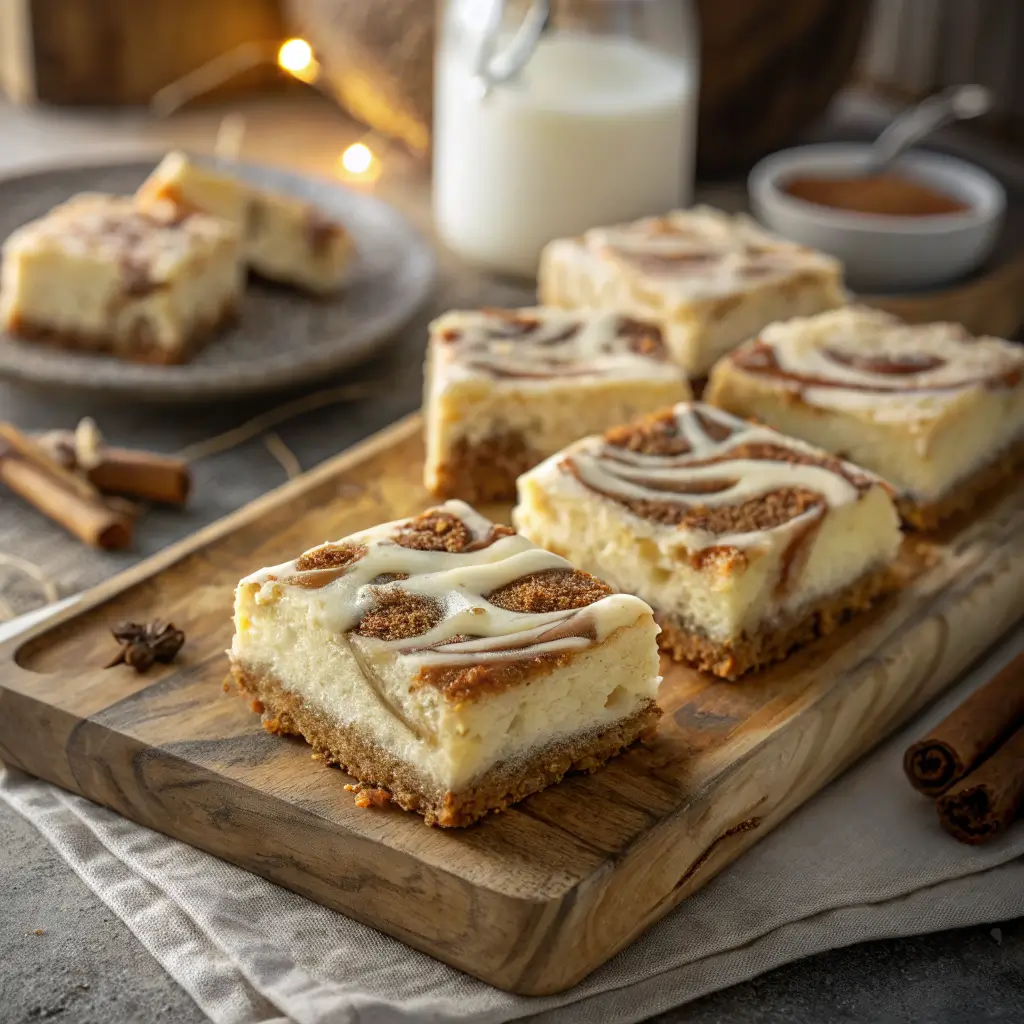
We’re crossing streams here, and the result is glorious. Imagine the tangy richness of cheesecake swirled with the warm, spiced comfort of a cinnamon roll, all on a buttery graham cracker crust. Yeah.
The Rundown
- Prep Time: 20 minutes
- Cook Time: 40-45 minutes
- Chill Time: 4 hours
- Serves: 16 bars
What You’ll Need
- Equipment: 9×13 inch baking pan, mixing bowls, electric mixer.
- Ingredients:
- Crust: 2 cups graham cracker crumbs, 1/2 cup melted butter, 2 tbsp sugar.
- Cheesecake: 3 (8 oz) packages cream cheese (softened), 1 cup sugar, 3 large eggs, 1 tsp vanilla, 1/2 cup sour cream.
- Cinnamon Swirl: 1/2 cup brown sugar, 2 tbsp all-purpose flour, 2 tbsp cinnamon, 3 tbsp melted butter.
Let’s Make It
- Crust Foundation: Press the crumb mixture into the bottom of your pan. Bake at 325°F (165°C) for 10 minutes.
- Creamy Dream: Beat cream cheese and sugar until smooth. Add eggs one at a time, then vanilla and sour cream. Pour over the crust.
- The Swirl: Mix all the cinnamon swirl ingredients. Drop spoonfuls over the cheesecake batter. Use a knife to gently swirl it through, creating a marbled pattern. Don’t overmix!
- Bake & Chill: Bake for 40-45 minutes, until the center is almost set. Turn off the oven, crack the door, and let it cool inside for 1 hour. Then, refrigerate for at least 4 hours before slicing.
Chef’s Notes
- Clean Cuts: For perfect bars, dip your knife in hot water and wipe it clean between each cut.
- Warm It Up: A 10-second zap in the microwave before serving takes these from great to “oh-my-goodness.”
Also Read: 10 Easy Cookie Recipes Homemade Comfort Bites
7. Frozen Peanut Butter Banana Pops
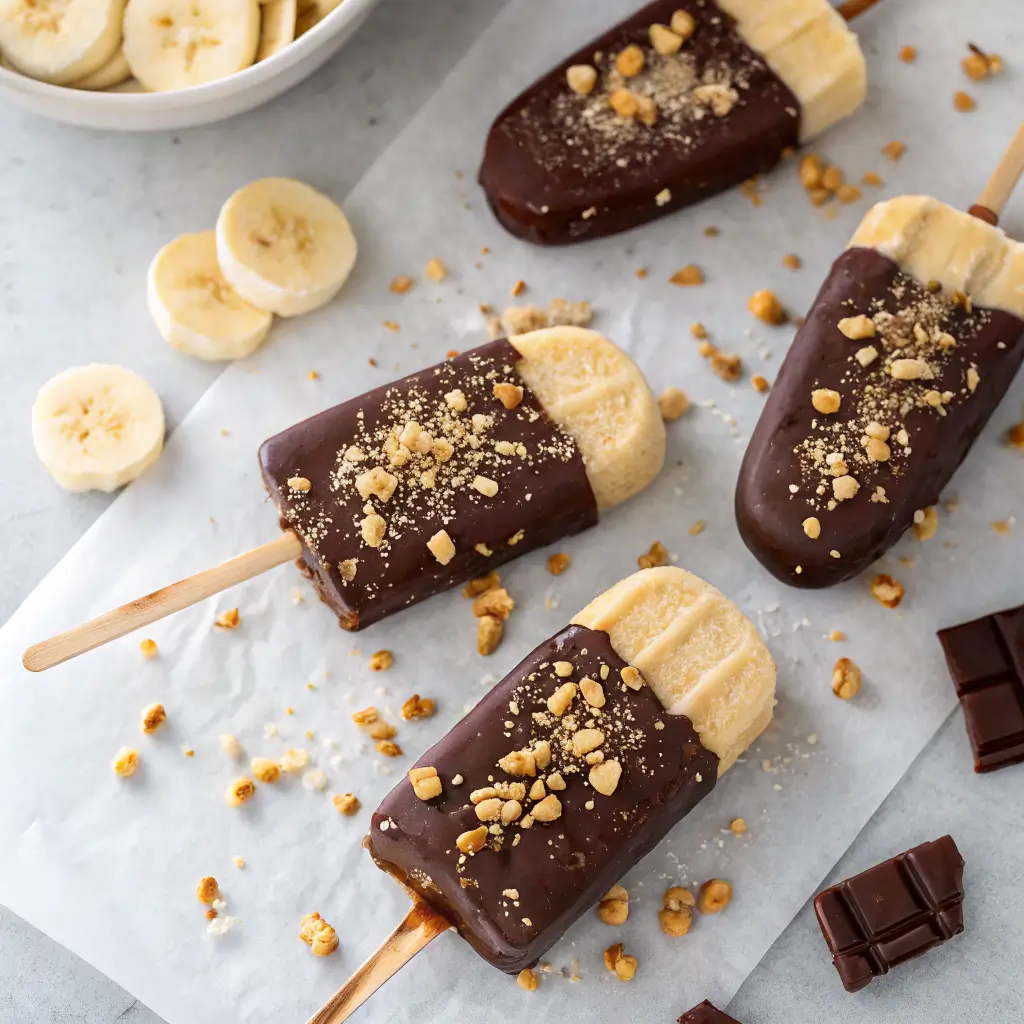
Healthy-ish, incredibly easy, and endlessly customizable. These are the perfect treat for a hot day or when you just want something sweet that won’t weigh you down. Kids go absolutely bonkers for these.
The Rundown
- Prep Time: 10 minutes
- Freeze Time: 2 hours
- Serves: 4 pops
What You’ll Need
- Equipment: Parchment-lined baking sheet, popsicle sticks.
- Ingredients:
- 2 large bananas, peeled and cut in half crosswise
- 1/2 cup creamy peanut butter (or any nut/seed butter)
- 1/2 cup chocolate chips (dark, milk, or white)
- 1 tsp coconut oil
- Toppings: Crushed peanuts, sprinkles, granola, shredded coconut.
Let’s Make It
- Stick ‘Em: Insert a popsicle stick into the flat end of each banana half.
- PB Slather: Spread a generous layer of peanut butter over each banana.
- Freeze Solid: Place them on the baking sheet and freeze for at least 1 hour until firm.
- Chocolate Dip: Melt the chocolate chips and coconut oil together. Dip each frozen pop into the chocolate, letting the excess drip off. Quickly add your chosen toppings before the chocolate sets.
- Final Freeze: Return to the freezer for another hour. Let sit at room temp for 2-3 minutes before eating.
Chef’s Notes
- Ripe is Fine: Use bananas that are ripe but still firm enough to hold their shape on a stick.
- Allergy Friendly: Use sunflower seed butter and dairy-free chocolate for a top-8-allergen-free treat.
8. Raspberry White Chocolate Mousse

This is elegance in a glass. It’s light, airy, and the tartness of the raspberries cuts through the sweetness of the white chocolate perfectly. It’s the dessert that makes people think you went to culinary school.
The Rundown
- Prep Time: 20 minutes
- Chill Time: 2 hours
- Serves: 4-6
What You’ll Need
- Equipment: Mixing bowls, electric mixer, serving glasses.
- Ingredients:
- 6 oz good-quality white chocolate, finely chopped
- 1 1/2 cups heavy whipping cream, divided
- 1 cup fresh raspberries (plus more for garnish)
- 2 tbsp powdered sugar
- 1 tsp vanilla extract
Let’s Make It
- Chocolate Base: Place chopped white chocolate in a bowl. Heat 1/2 cup of the cream until just simmering. Pour it over the chocolate and let it sit for 2 minutes, then stir until completely smooth. Let this cool to room temperature.
- Berry Blast: Puree the raspberries and press through a fine-mesh sieve to remove the seeds. Stir the puree into the cooled white chocolate mixture.
- Fluff It Up: Whip the remaining 1 cup cream with powdered sugar and vanilla to soft peaks.
- Fold Gently: Fold the whipped cream into the raspberry-chocolate mixture until no streaks remain. Be gentle to keep it airy!
- Chill Out: Divide among glasses and chill for at least 2 hours.
Chef’s Notes
- Quality Matters: Use a white chocolate bar you’d enjoy eating (like Lindt or Ghirardelli), not white chips, for the best texture.
- Quick Garnish: A fresh raspberry and a white chocolate curl on top before serving makes it look stunning.
9. Nutella Stuffed Cookie Skillet
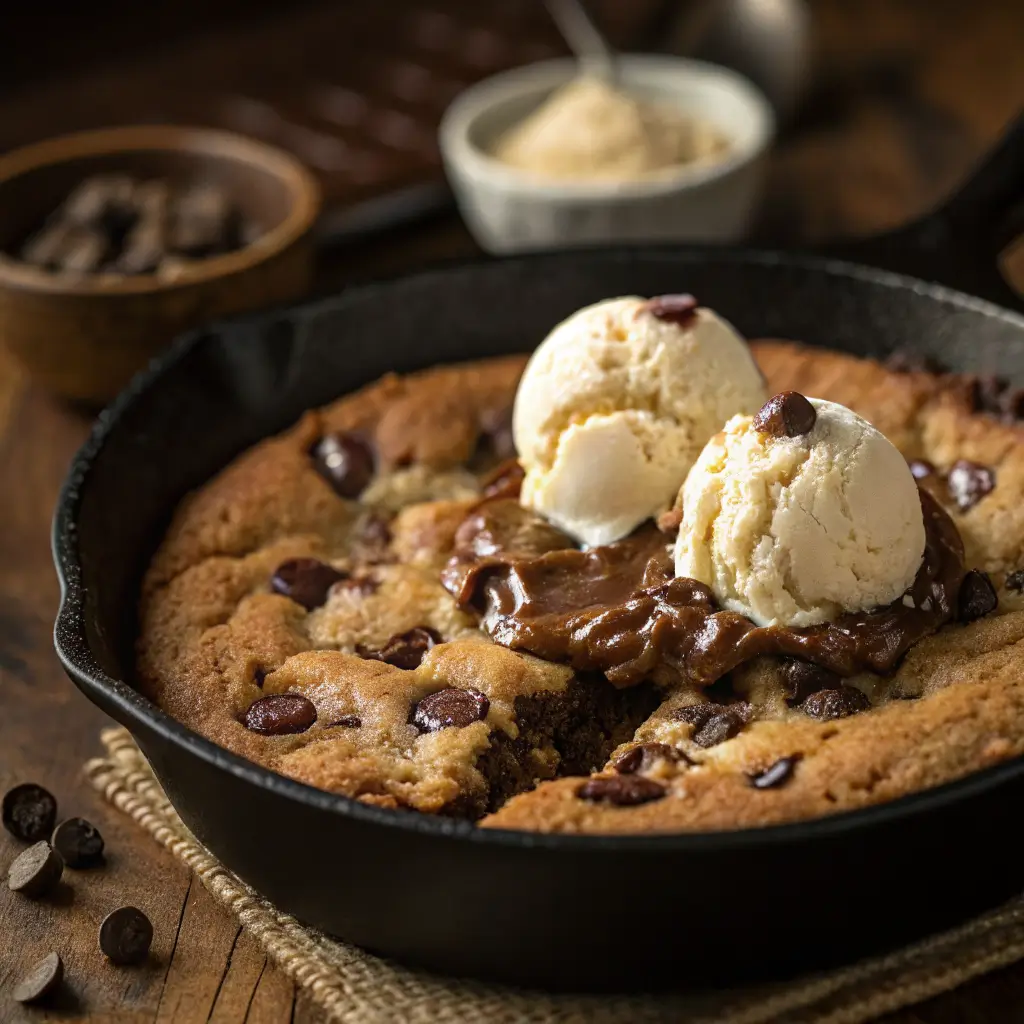
This is the dessert for when you can’t decide between a cookie and a cake. You get a giant, chewy, warm cookie with a molten Nutella center, served straight from the skillet. Grab a spoon and some friends. Or not. I won’t tell.
The Rundown
- Prep Time: 15 minutes
- Cook Time: 25-30 minutes
- Serves: 6-8
What You’ll Need
- Equipment: 10-inch cast-iron or oven-safe skillet, mixing bowl.
- Ingredients:
- 1/2 cup (1 stick) unsalted butter, melted
- 1/2 cup granulated sugar
- 1/2 cup packed brown sugar
- 1 large egg
- 1 tsp vanilla extract
- 1 1/2 cups all-purpose flour
- 1/2 tsp baking soda
- 1/4 tsp salt
- 1 cup chocolate chips
- 1/2 cup Nutella
Let’s Make It
- Mix the Dough: Whisk melted butter and sugars. Add egg and vanilla. Stir in flour, baking soda, and salt, then fold in chocolate chips.
- First Layer: Press half of the cookie dough evenly into your greased skillet.
- Nutella Core: Spread the Nutella over the dough, leaving a small border around the edge.
- Seal It Up: Crumble the remaining cookie dough over the Nutella, covering it as best you can.
- Bake to Perfection: Bake at 350°F (175°C) for 25-30 minutes. The edges should be golden, and the center will look slightly underdone—that’s perfect! Let it cool for 10 minutes.
Chef’s Notes
- Serving Suggestion: A giant scoop of vanilla ice cream on top is mandatory. The hot/cold combo is everything.
- Don’t Overbake! The residual heat will continue to cook it. You want that gooey center.
Also Read: 10 Delicious Cookie Dough Recipes for Cozy Cravings
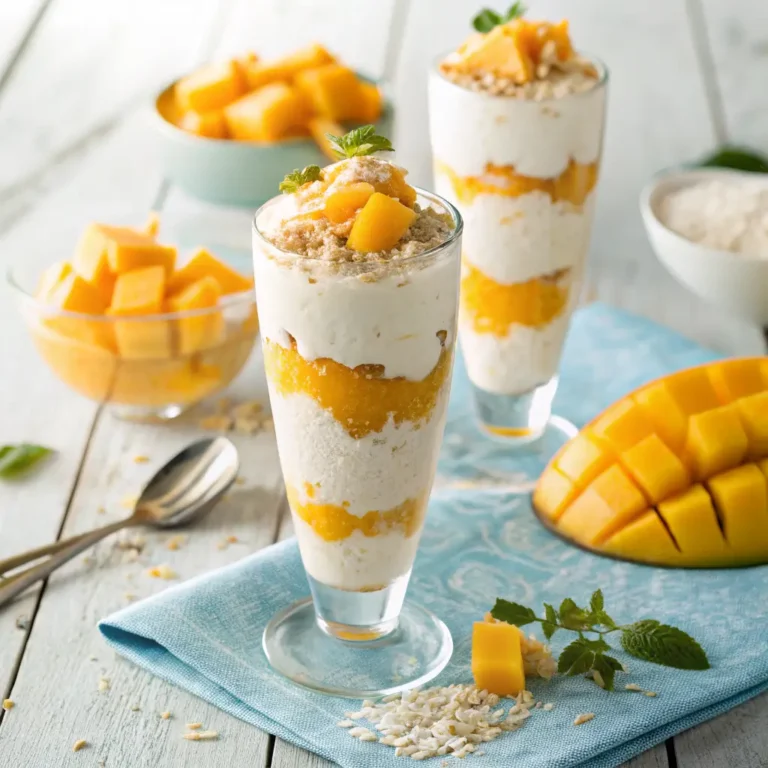
10. Coconut Mango Paradise Parfaits
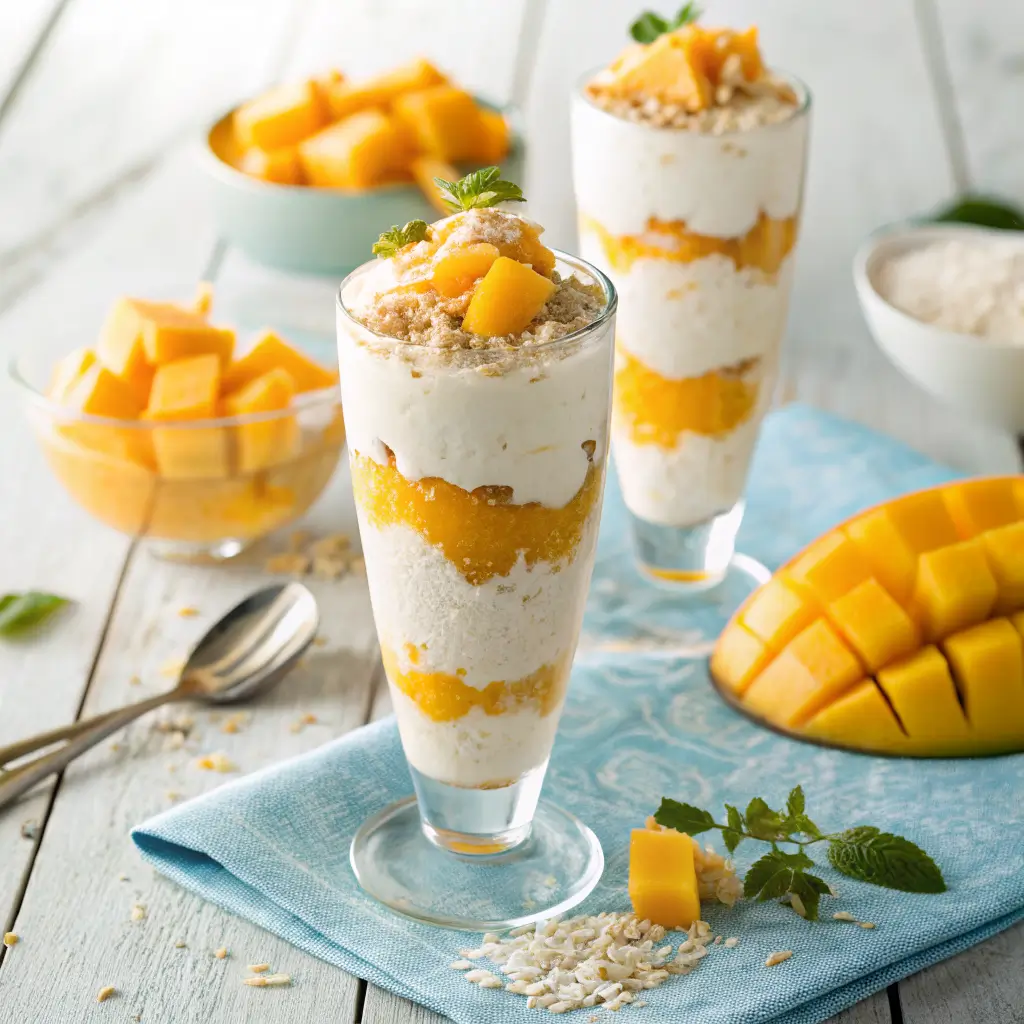
Close your eyes and take a bite. You’re basically on a tropical vacation. The creamy coconut, bright mango, and crunchy granola layers are refreshing, light, and so satisfying. It’s a dessert that feels like a hug from the sun.
The Rundown
- Prep Time: 15 minutes
- Chill Time: 1 hour (optional)
- Serves: 4
What You’ll Need
- Equipment: Serving glasses, mixing bowl.
- Ingredients:
- 1 (13.5 oz) can full-fat coconut milk, chilled overnight
- 2 tbsp powdered sugar
- 1 tsp vanilla extract
- 2 ripe mangoes, diced (or 2 cups frozen mango, thawed)
- 1 cup granola (coconut-flavored is amazing here)
- Toasted coconut flakes for garnish
Let’s Make It
- Whip the Cream: Open the chilled can of coconut milk. Scoop out the thick, solid cream from the top into a bowl (save the water for smoothies!). Whip it with the powdered sugar and vanilla until fluffy.
- The Parfait Dance: In your glasses, create layers: start with granola, then a layer of diced mango, then a big dollop of whipped coconut cream. Repeat!
- Final Touch: Top with a sprinkle of toasted coconut flakes. You can chill these for an hour to let the flavors meld, or dive right in.
Chef’s Notes
- Cream Success: Only the solid part of the chilled coconut milk will whip. Make sure your can is full-fat and chilled for at least 12 hours.
- Make it Vegan: This recipe is naturally vegan if you use a vegan granola!
Final Thoughts From My Kitchen to Yours
So there you have it—ten paths to dessert glory. The best part? They’re all about joy, not stress. Whether you’re whipping up a mug cake at midnight or layering a trifle for a party, remember that the best ingredient is the fun you have making it.
Don’t be afraid to mix it up, swap ingredients, or lick the spoon. That’s what being a home dessert enthusiast is all about. Now, which one are you trying first? I’m betting on that Salted Caramel Brownie Trifle. You won’t regret it. 🙂