
Let’s be real for a second. Is there any problem that a warm, gooey, freshly baked cookie can’t at least make a little bit better? A bad day at work? Cookie. A fight with your significant other? Cookie.
A global existential crisis? Okay, maybe you need a batch of cookies for that one. I’ve been there, my friend, elbow-deep in flour at 10 PM, seeking solace in butter and sugar. And after years of what I like to call “kitchen research” (and my family calls “the ongoing smell of vanilla extract”), I’ve compiled a list of absolute showstoppers.
These aren’t just your average, run-of-the-mill cookie recipes. These are 10 cookie recipe ideas designed to hit every craving, from sophisticated and salty-sweet to downright fudgy and decadent.
We’re going on a journey, from the nutty depths of brown butter to the vibrant pop of matcha. So, preheat your oven, grab your favorite mixing bowl, and let’s get into it. Your future self (and anyone lucky enough to be in your kitchen) will thank you.
1. The Game-Changer: Brown Butter Sea Salt Chocolate Chip Cookies
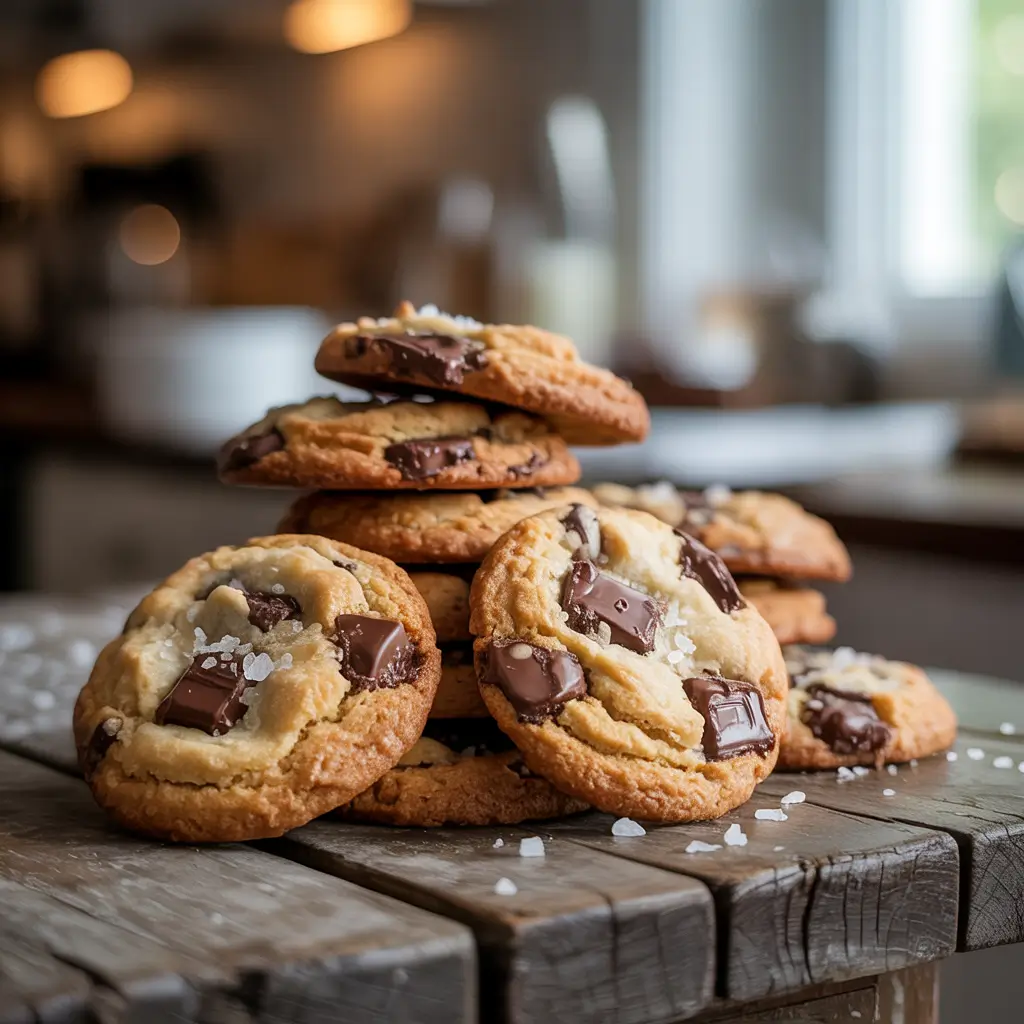
If you think all chocolate chip cookies are created equal, prepare to have your mind blown. The secret weapon here isn’t a rare ingredient from a mountaintop—it’s a simple technique: browning the butter. This one step transforms the entire flavor profile, adding a deep, nutty, almost toffee-like richness that makes the classic feel brand new. It’s the upgrade you didn’t know you needed.
Prep Time, Cook Time, & The Basics
- Prep Time: 20 minutes (plus at least 1 hour of chilling—non-negotiable!)
- Cook Time: 10-12 minutes per batch
- Yield: About 24 cookies
Ingredients & Equipment
- Ingredients:
- 1 cup (2 sticks) unsalted butter
- 1 cup packed dark brown sugar
- ½ cup granulated sugar
- 2 large eggs
- 2 teaspoons pure vanilla extract
- 2 ½ cups all-purpose flour
- 1 teaspoon baking soda
- 1 ½ teaspoons flaky sea salt (like Maldon), plus more for topping
- 2 cups semi-sweet or dark chocolate chips/chunks
- Equipment:
- Medium saucepan
- Large mixing bowl
- Hand mixer or stand mixer
- Whisk
- Measuring cups and spoons
- Baking sheets
- Parchment paper
- Cooling rack
Instructions
- Brown that butter: Melt the butter in a saucepan over medium heat. It will foam, then crackle. Once the crackling stops, swirl the pan constantly until you see golden brown flecks at the bottom and it smells nutty. Immediately pour it into a heatproof bowl to stop the cooking. Let it cool for 15 minutes.
- Mix the wet ingredients: Whisk the brown butter and both sugars together until smooth. Add the eggs and vanilla, whisking until combined.
- Combine the dry ingredients: In a separate bowl, whisk the flour, baking soda, and 1 ½ teaspoons of sea salt.
- Bring it together: Gradually add the dry ingredients to the wet ingredients, mixing with a spoon or spatula until just combined. Do not overmix. Fold in the chocolate chips.
- Chill, for real: Cover the dough and refrigerate for at least one hour, preferably overnight. This prevents spread and deepens the flavor.
- Bake: Preheat oven to 375°F (190°C). Scoop rounded tablespoons of dough onto parchment-lined baking sheets. Sprinkle a tiny pinch of extra flaky sea salt on top of each cookie ball. Bake for 10-12 minutes, until the edges are golden but the centers look slightly underdone.
- Cool: Let them cool on the baking sheet for 5 minutes before transferring to a wire rack. This lets them set up perfectly.
Notes
- Don’t skip the chill. I know it’s tempting, but warm dough = flat, greasy puddles. Patience is a virtue, and in this case, it’s a delicious one.
- The sea salt on top is non-negotiable. It’s the final flourish that makes people go, “Whoa, what is that?”
- IMO, these are even better the next day. The flavors have time to really get to know each other.
2. The Sophisticated Vibe: Soft Chewy Matcha White Chocolate Cookies
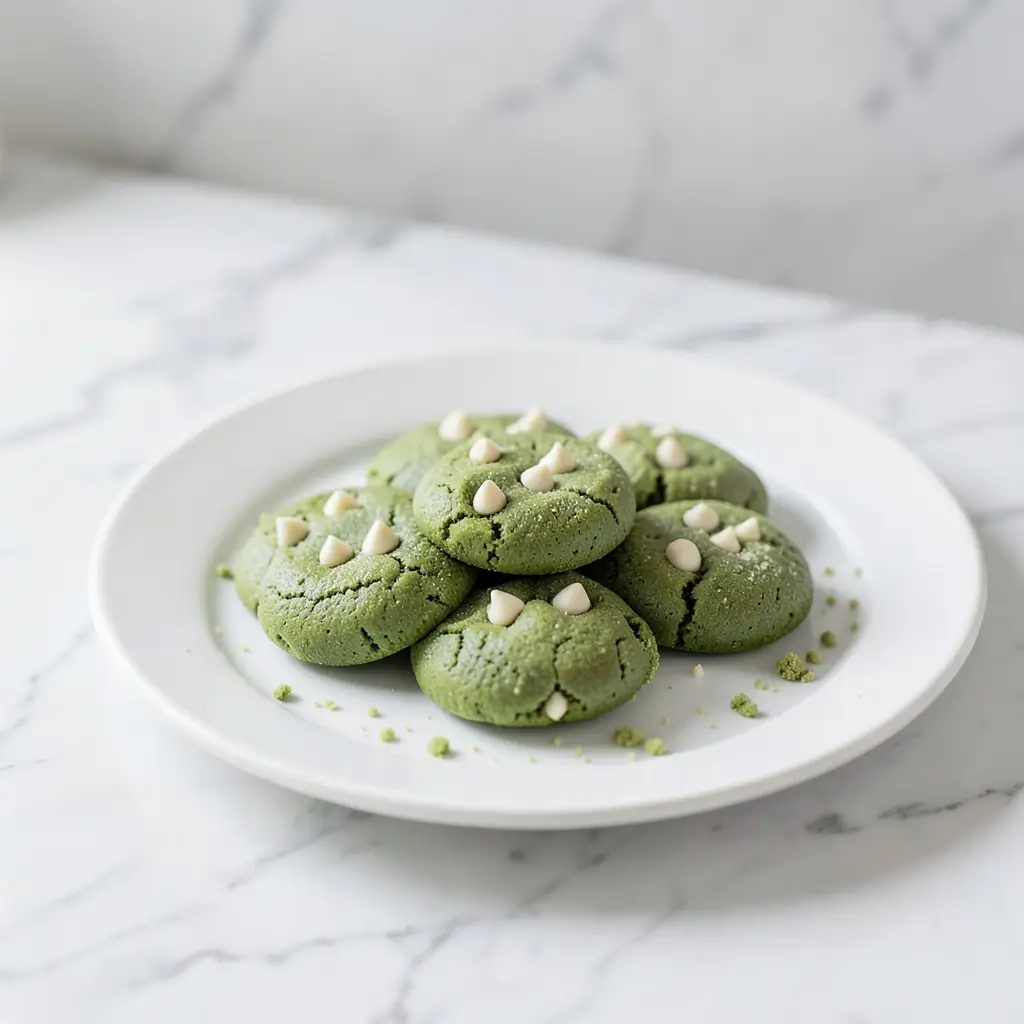
Want to feel like you’re baking in a trendy café in Tokyo? Enter the matcha cookie. Matcha, powdered green tea, brings a beautiful earthy, slightly bitter note that is absolute magic against the creamy sweetness of white chocolate. They’re not just tasty; they’re stunning, with a vibrant green hue that’s a total Instagram flex. :/
Prep Time, Cook Time, & The Basics
- Prep Time: 15 minutes
- Cook Time: 9-11 minutes per batch
- Yield: About 20 cookies
Ingredients & Equipment
- Ingredients:
- 2 ¼ cups all-purpose flour
- 2 tablespoons high-quality culinary-grade matcha powder
- 1 teaspoon baking soda
- ½ teaspoon salt
- 1 cup (2 sticks) unsalted butter, softened
- ¾ cup granulated sugar
- ¾ cup packed light brown sugar
- 2 large eggs
- 2 teaspoons vanilla extract
- 1 ½ cups white chocolate chips
- Equipment: (Same as recipe #1, plus a sifter for the matcha)
Instructions
- Prep the dry goods: Sift the flour, matcha powder, baking soda, and salt together. Sifting is key to avoid clumps of bitter matcha!
- Cream the butter and sugars: In a large bowl, beat the softened butter with both sugars until light and fluffy, about 3-4 minutes.
- Add the eggs: Beat in the eggs one at a time, then add the vanilla.
- Combine: Gradually mix in the sifted dry ingredients on low speed until just a few flour streaks remain. Fold in the white chocolate chips with a spatula.
- Scoop and bake: Preheat oven to 350°F (175°C). Scoop dough balls onto lined baking sheets. Bake for 9-11 minutes. They might look a little soft, but they’ll firm up as they cool.
- Cool completely on the baking sheet before moving.
Notes
- Matcha quality matters. A cheap, low-quality matcha will taste grassy and dull. Spend a little more for a vibrant, smooth culinary-grade powder. Your taste buds will thank you.
- These cookies are all about the balance. The bitter matcha and sweet white chocolate should play off each other perfectly.
- Store them in an airtight container; they can dry out faster than other cookies.
3. The Lazy(ish) Hero: No-Bake Peanut Butter Oat Cookies
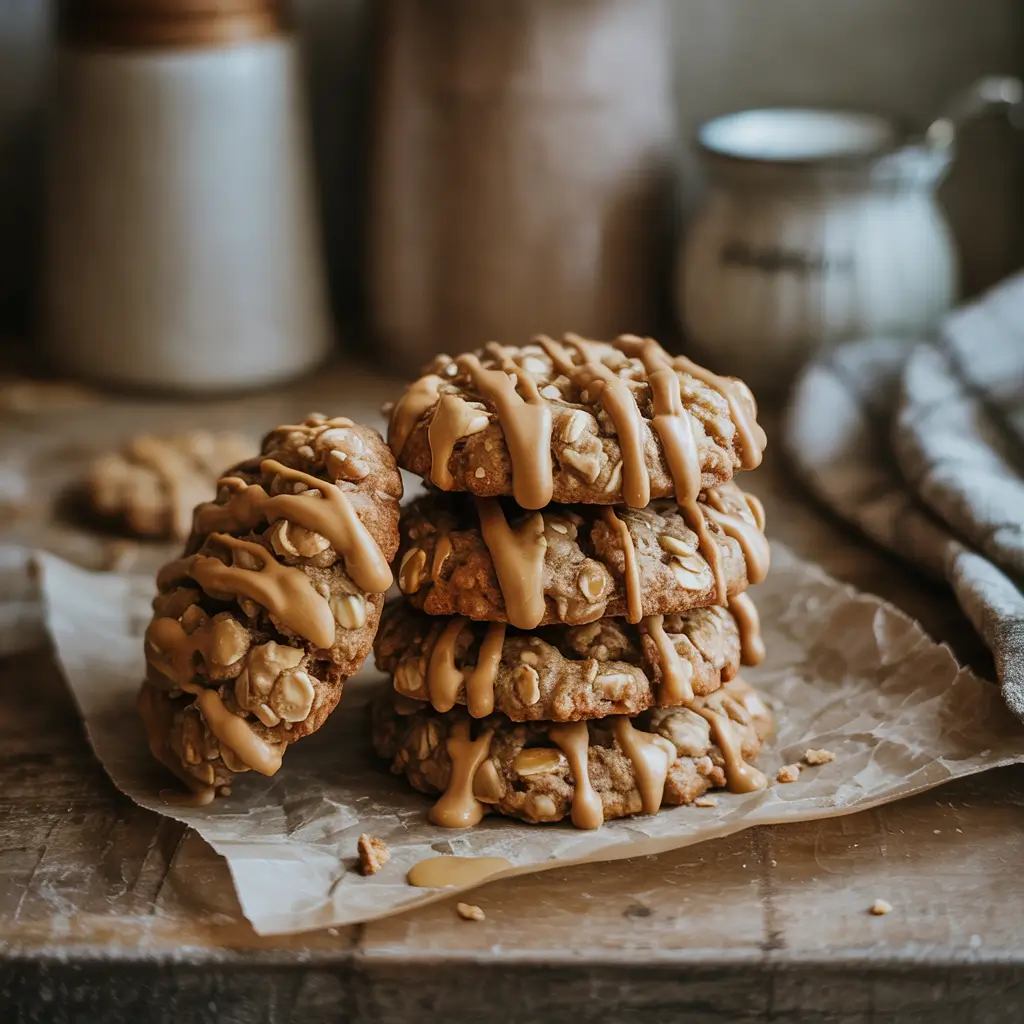
Sometimes you need cookies, like, yesterday. Or, more realistically, it’s July and the thought of turning on your oven makes you break out in a sweat. That’s where these glorious, no-bake wonders come in. They take about 10 minutes of active work, and you end up with a chewy, fudgy, protein-packed (well, sort of) treat. They’re the ultimate hack.
Prep Time, Cook Time, & The Basics
- Prep Time: 10 minutes
- Cook Time: 0 minutes! (Chill time: 30-60 minutes)
- Yield: About 18 cookies
Ingredients & Equipment
- Ingredients:
- ½ cup (1 stick) unsalted butter
- 1 ½ cups granulated sugar
- ½ cup milk
- ¾ cup creamy peanut butter
- 3 cups old-fashioned rolled oats
- 1 teaspoon vanilla extract
- Pinch of salt
- Equipment:
- Medium saucepan
- Large mixing bowl
- Wooden spoon or sturdy spatula
- Wax paper or parchment paper
Instructions
- Bring to a boil: In the saucepan, combine the butter, sugar, and milk. Bring to a rolling boil over medium heat, stirring constantly. Let it boil for exactly one minute, then remove from heat.
- Stir in the good stuff: Immediately stir in the peanut butter, vanilla, and salt until smooth.
- Add the oats: Pour the mixture over the oats in the large bowl and stir until every oat is coated.
- Drop and set: Working quickly, drop spoonfuls of the mixture onto wax paper. Let them sit at room temperature or pop them in the fridge for 30-60 minutes until firm.
Notes
- The one-minute boil is the magic step. It helps the sugar syrup set up properly so your cookies aren’t a sticky mess.
- You can add a ½ cup of mix-ins like mini chocolate chips or shredded coconut right after you stir in the oats. Just sayin’.
- FYI, these are dangerously easy to make. You might find yourself whipping them up at 11 PM. No judgment here.
Also Read: 10 Delicious Spinach Pasta Recipes for Cozy Dinners
4. The Show-Off: Red Velvet Cream Cheese Stuffed Cookies
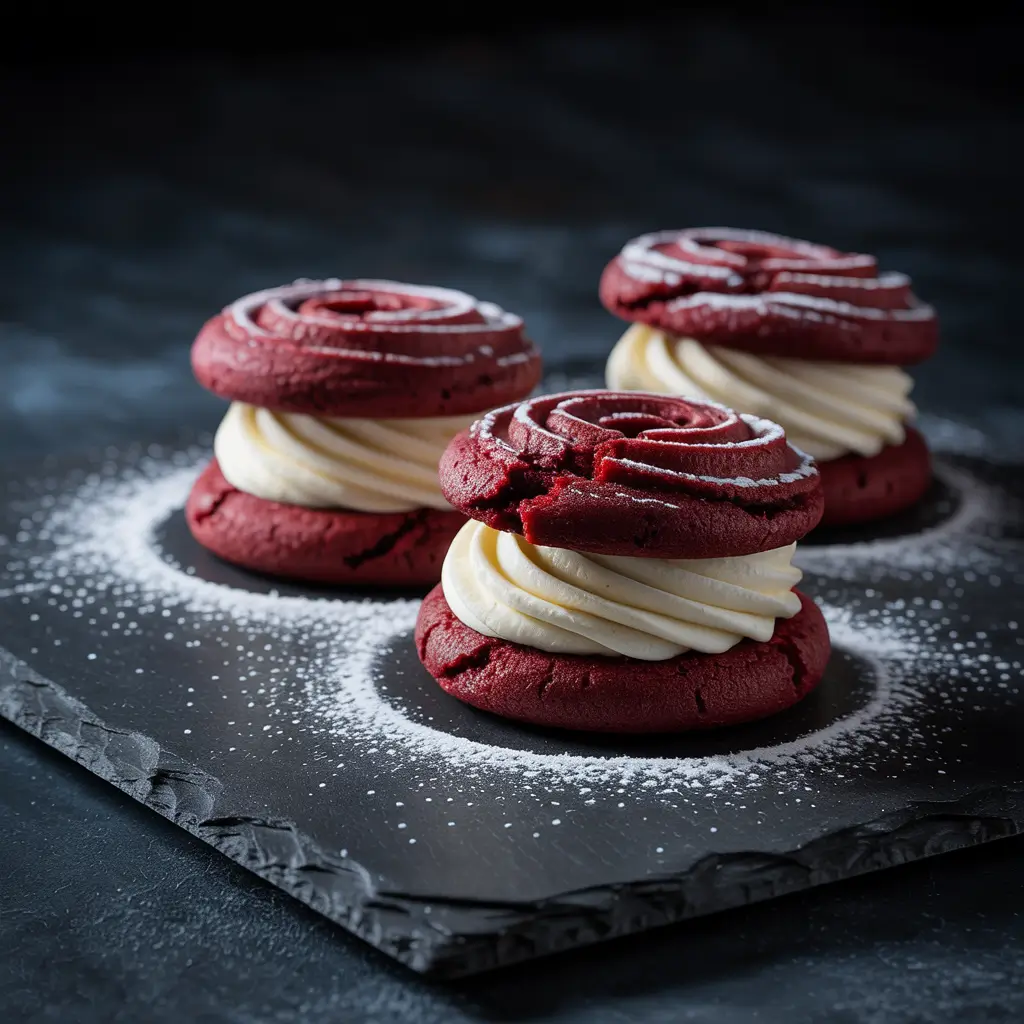
This is the recipe you bring to a party when you want people to question your sanity and then worship you as a baking deity. They look complex, they taste incredible, and the surprise of biting into a soft red velvet cookie to find a creamy, tangy cheesecake center? Pure magic. It’s two desserts in one, and it’s wildly impressive.
Prep Time, Cook Time, & The Basics
- Prep Time: 30 minutes (plus chilling)
- Cook Time: 11-13 minutes per batch
- Yield: About 16 stuffed cookies
Ingredients & Equipment
- Ingredients:
- For the Cream Cheese Filling: 8 oz cream cheese (softened), ¼ cup powdered sugar, ½ tsp vanilla.
- For the Red Velvet Dough: 2 ½ cups all-purpose flour, 2 tbsp cocoa powder, 1 tsp baking soda, ½ tsp salt, 1 cup (2 sticks) butter (softened), 1 cup granulated sugar, 1 large egg, 1 tbsp red food coloring, 1 tsp vanilla, 1 tsp white vinegar.
- Equipment: (Standard baking equipment, plus a small bowl for filling and a tablespoon measure)
Instructions
- Make the filling: Beat the cream cheese, powdered sugar, and vanilla until smooth. Scoop into tablespoon-sized balls and freeze for at least 30 minutes until solid.
- Make the dough: Whisk flour, cocoa, baking soda, and salt. In another bowl, cream butter and sugar. Add egg, food coloring, vanilla, and vinegar. Gradually mix in dry ingredients.
- Assemble: Take a golf ball-sized piece of dough, flatten it, place a frozen cream cheese ball in the center, and carefully wrap the dough around it, sealing completely. Roll into a smooth ball.
- Bake: Preheat oven to 350°F (175°C). Place dough balls on lined sheets, leaving space. Bake 11-13 minutes. The centers will look soft. Let them cool completely on the sheet.
Notes
- Freezing the filling is the secret. If it’s soft, it’ll just melt into the dough. Frozen = perfect pocket of cream cheese.
- Don’t overbake! You want them soft and fudgy, not cakey.
- This recipe is a project, but so, so worth it. Put on some good music and enjoy the process.
5. The Fudgy Classic: Double Chocolate Fudge Crinkle Cookies
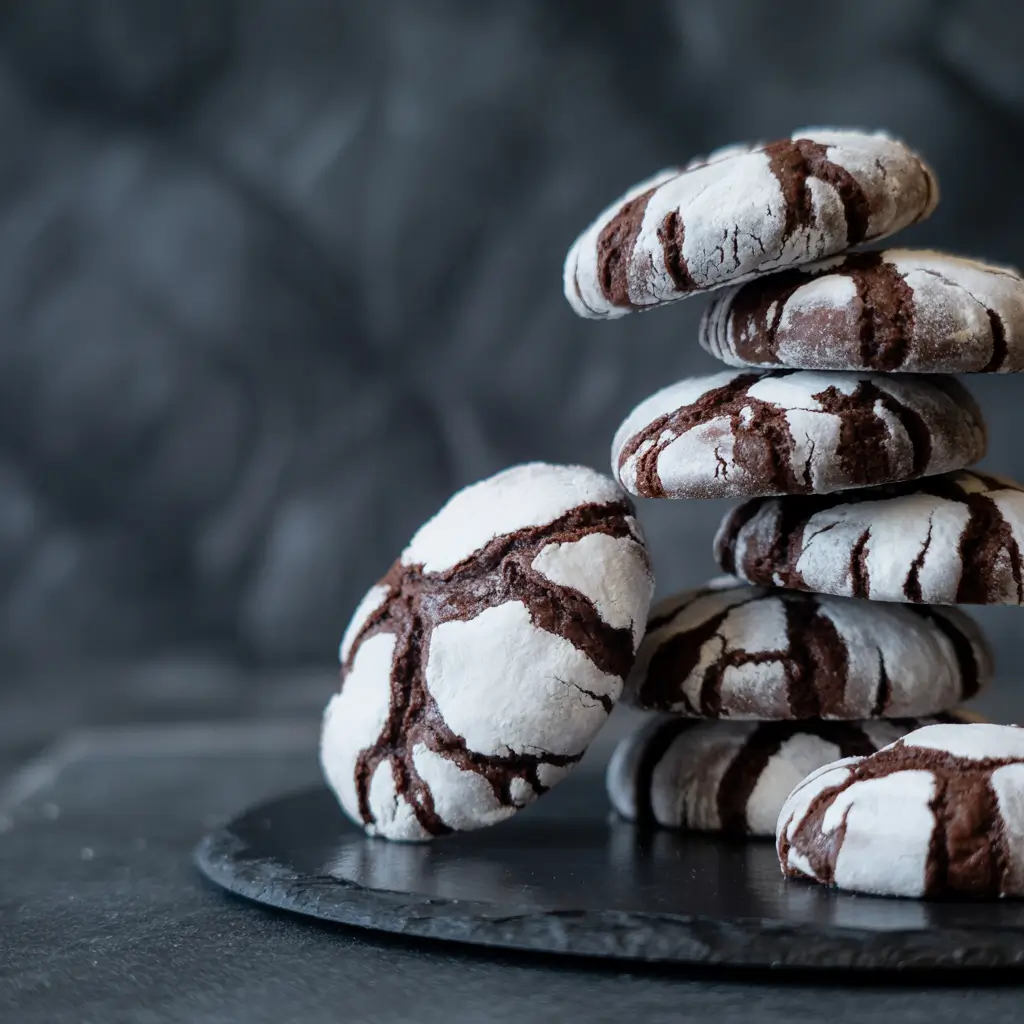
These are the cookies for the chocolate purist. The ones who believe there’s no such thing as “too chocolatey.” They have a brownie-like interior, a gorgeous cracked powdered sugar exterior, and an intensity that can only be described as fudgy to the max. They’re like a hug for your chocolate-loving soul.
Prep Time, Cook Time, & The Basics
- Prep Time: 15 minutes (plus 2 hours chilling)
- Cook Time: 10-12 minutes per batch
- Yield: About 30 cookies
Ingredients & Equipment
- Ingredients:
- 1 cup all-purpose flour
- ½ cup unsweetened cocoa powder
- 1 tsp baking powder
- ¼ tsp baking soda
- ½ tsp salt
- 1 ½ cups semi-sweet chocolate chips
- ¼ cup unsalted butter
- 1 ¼ cups granulated sugar
- 2 large eggs
- 1 tsp vanilla extract
- ½ cup powdered sugar (for rolling)
- Equipment: (Standard baking equipment)
Instructions
- Melt chocolate & butter: In a microwave-safe bowl, melt the chocolate chips and butter in 30-second bursts, stirring until smooth. Let cool slightly.
- Mix the batter: Whisk flour, cocoa, baking powder, baking soda, and salt. In a large bowl, whisk sugar, eggs, and vanilla until combined. Slowly whisk in the melted chocolate mixture. Fold in the dry ingredients until just combined. The dough will be soft.
- Chill: Cover and refrigerate for at least 2 hours until firm.
- Coat and bake: Preheat oven to 325°F (165°C). Scoop dough into balls, roll generously in powdered sugar until heavily coated. Place on lined sheets and bake 10-12 minutes.
Notes
- The generous coating of powdered sugar is what creates the dramatic crinkle effect as they bake and spread. Don’t be shy!
- Chilling is mandatory. This is a very wet dough; chilling makes it workable.
- These are perfect with a cold glass of milk. It’s science.
6. The Sunshine Bite: Lemon Glazed Shortbread Cookies
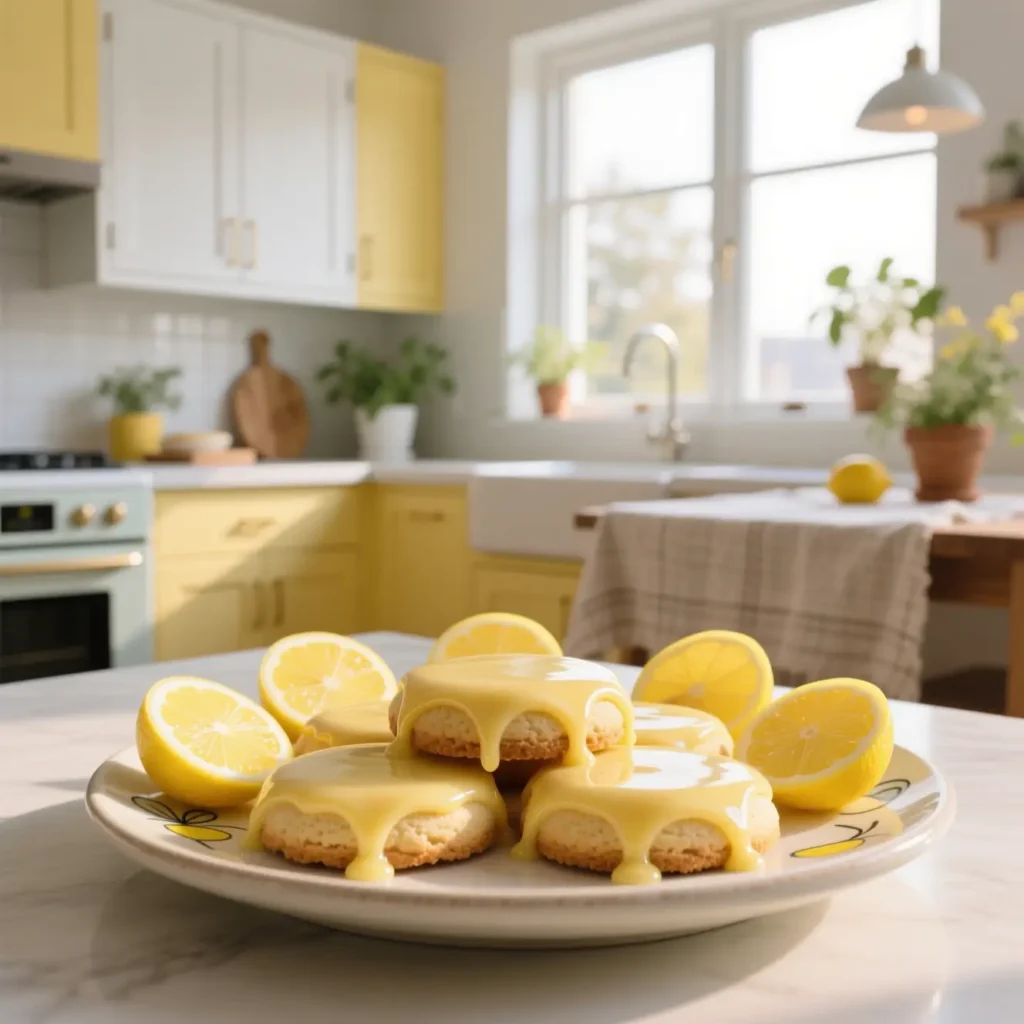
Sometimes you need a break from all that chocolate (I know, I know, heresy!). These are light, buttery, crisp, and bursting with bright, sunny lemon flavor. The simple glaze adds a sweet-tart kick that makes them utterly addictive. They’re like a little edible ray of sunshine.
Prep Time, Cook Time, & The Basics
- Prep Time: 20 minutes
- Cook Time: 10-12 minutes per batch
- Yield: About 36 cookies
Ingredients & Equipment
- Ingredients:
- For the cookies: 1 cup (2 sticks) butter (softened), ¾ cup powdered sugar, zest of 2 lemons, 2 tbsp fresh lemon juice, 1 tsp vanilla, 2 cups all-purpose flour, ¼ tsp salt.
- For the glaze: 1 cup powdered sugar, 2-3 tbsp fresh lemon juice.
- Equipment: (Standard baking equipment, plus a zester)
Instructions
- Cream: Beat butter, powdered sugar, and lemon zest until pale and fluffy. Mix in lemon juice and vanilla.
- Add flour: Gradually add flour and salt, mixing on low until a soft dough forms.
- Shape and chill: Roll dough into 1-inch balls, place on sheets, and flatten slightly with the bottom of a glass. Chill for 15 minutes.
- Bake: Preheat oven to 350°F (175°C). Bake 10-12 minutes until the edges are just barely golden. Cool completely.
- Glaze: Whisk powdered sugar and enough lemon juice to make a thick but drizzly glaze. Dip the tops of the cooled cookies in the glaze and let set.
Notes
- Don’t overbake. Shortbread should be pale with just a hint of gold on the edges for the perfect tender-crisp texture.
- The lemon zest is where all the potent flavor lives. Don’t skip it!
- These keep beautifully in an airtight container for up to a week.
Also Read: 10 Irresistible Steak Pasta Recipes for Cozy Nights
7. The Cinnamon Sensation: Cinnamon Sugar Snickerdoodle Cookies
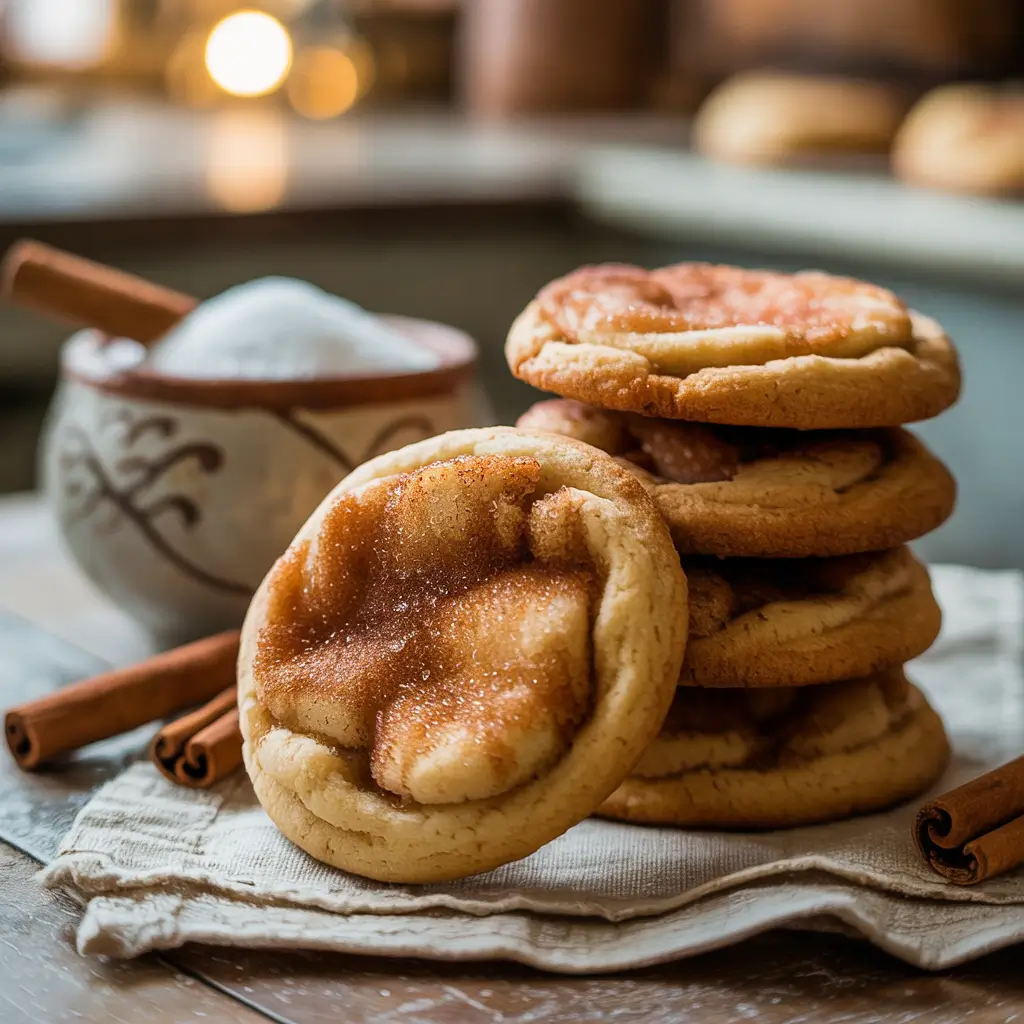
If a cookie could be cozy, it would be a Snickerdoodle. The perfect snickerdoodle has a tangy chew (thanks to cream of tartar) and is rolled in a generous blanket of cinnamon-sugar. It’s the cookie equivalent of your favorite sweater. Simple, classic, and always comforting.
Prep Time, Cook Time, & The Basics
- Prep Time: 15 minutes
- Cook Time: 8-10 minutes per batch
- Yield: About 36 cookies
Ingredients & Equipment
- Ingredients:
- 2 ¾ cups all-purpose flour
- 2 tsp cream of tartar
- 1 tsp baking soda
- ½ tsp salt
- 1 cup (2 sticks) butter (softened)
- 1 ½ cups granulated sugar
- 2 large eggs
- For rolling: 3 tbsp granulated sugar + 1 tbsp ground cinnamon.
- Equipment: (Standard baking equipment)
Instructions
- Combine dry ingredients: Whisk flour, cream of tartar, baking soda, and salt.
- Cream butter and sugar: Beat butter and 1 ½ cups sugar until fluffy. Add eggs one at a time.
- Bring together: Gradually mix in dry ingredients until just combined.
- Roll and coat: Mix the 3 tbsp sugar and cinnamon in a small bowl. Roll dough into 1-inch balls, then roll each ball in the cinnamon-sugar to coat thoroughly.
- Bake: Preheat oven to 400°F (200°C). Place balls on sheets and bake 8-10 minutes. They should be puffy and soft. Let them cool on the sheet to set.
Notes
- Cream of tartar is the key to that distinctive tangy flavor and chewy texture. Don’t substitute it with baking powder.
- Bake them until they look almost undone. They’ll firm up into chewy perfection as they cool.
- IMO, snickerdoodles are best eaten within the first two days. But let’s be real, they never last that long.
8. The Ultimate Indulgence: Nutella Stuffed Soft Center Cookies

Let’s just call this what it is: a love letter to hazelnut-chocolate spread. These cookies are soft, chewy, and contain a molten, gooey pocket of Nutella in the center. It’s a surprise in every bite, and it’s absolutely decadent. Make these for someone you really, really like.
Prep Time, Cook Time, & The Basics
- Prep Time: 25 minutes (plus chilling for Nutella)
- Cook Time: 12-14 minutes per batch
- Yield: About 16 cookies
Ingredients & Equipment
- Ingredients:
- 1 cup Nutella
- 2 ¼ cups all-purpose flour
- 1 tsp baking soda
- 1 tsp cornstarch
- ½ tsp salt
- ¾ cup (1 ½ sticks) butter (melted & slightly cooled)
- 1 cup packed light brown sugar
- ½ cup granulated sugar
- 1 large egg + 1 egg yolk
- 2 tsp vanilla extract
- Equipment: (Standard baking equipment, plus a lined mini muffin tin or small baking sheet for freezing Nutella scoops)
Instructions
- Freeze the Nutella: Scoop 16 tablespoon-sized mounds of Nutella onto a parchment-lined sheet. Freeze for at least 1 hour until rock solid.
- Make the dough: Whisk flour, baking soda, cornstarch, and salt. In another bowl, whisk melted butter, both sugars, egg, egg yolk, and vanilla until smooth. Combine wet and dry ingredients.
- Assemble: Take about 3 tbsp of dough, flatten it, place a frozen Nutella ball in the center, and wrap the dough completely around it, sealing well. Repeat.
- Bake: Preheat oven to 325°F (165°C). Place stuffed dough balls on sheets and bake 12-14 minutes until the edges are set but the center is still soft. Cool completely.
Notes
- Freezing the Nutella is the only way this works. Otherwise, it just melts into the dough. Patience!
- Don’t overwork the dough when sealing in the Nutella, or it can become tough.
- Serve these warm. If you have leftovers (unlikely), a 10-second microwave blast will revive the gooey center.
9. The Guilt-Free(ish) Crisp: Almond Coconut Flour Keto Cookies

For my low-carb or gluten-free friends, I haven’t forgotten you! These cookies use almond and coconut flour to create a crisp, shortbread-like texture that’s surprisingly satisfying. They’re not trying to be a regular cookie—they’re their own delicious, low-sugar thing. And they’re perfect with a cup of black coffee.
Prep Time, Cook Time, & The Basics
- Prep Time: 10 minutes
- Cook Time: 10-12 minutes per batch
- Yield: About 20 cookies
Ingredients & Equipment
- Ingredients:
- 1 ½ cups blanched almond flour
- ¼ cup coconut flour
- ½ tsp baking soda
- ¼ tsp salt
- ⅓ cup melted coconut oil or butter
- ⅓ cup granulated erythritol or monk fruit sweetener
- 1 large egg
- 1 tsp vanilla extract
- Optional: ½ cup sugar-free chocolate chips or chopped nuts.
- Equipment: (Standard baking equipment)
Instructions
- Combine dry ingredients: Whisk almond flour, coconut flour, baking soda, and salt.
- Mix wet ingredients: In another bowl, whisk the melted coconut oil, sweetener, egg, and vanilla.
- Bring together: Mix wet into dry until a cohesive dough forms. Fold in any optional mix-ins.
- Bake: Preheat oven to 350°F (175°C). Roll into balls, place on a lined sheet, and flatten slightly. Bake 10-12 minutes until the edges are golden.
Notes
- Coconut flour is thirsty. It absorbs a ton of moisture, so the ratios here are specific. Don’t swap it for more almond flour.
- Let these cool completely on the sheet. They are very fragile when warm but firm up nicely.
- They have a unique, satisfying crunch that’s different from wheat-based cookies. Embrace it!
Also Read:10 Yummy Salmon Pasta Recipes for Rich Flavor Boost
10. The Jammy Jewel: Strawberry Jam Thumbprint Cookies

Last but certainly not least, the thumbprint cookie. It’s a buttery, vanilla-scented shortbread cradling a jewel of sweet, sticky jam. They look like they came from a bakery window, but they’re shockingly simple to make. The strawberry version is a classic, but feel free to use raspberry, apricot, or whatever jam makes your heart sing.
Prep Time, Cook Time, & The Basics
- Prep Time: 20 minutes
- Cook Time: 12-14 minutes per batch
- Yield: About 24 cookies
Ingredients & Equipment
- Ingredients:
- 1 cup (2 sticks) butter (softened)
- ⅔ cup granulated sugar
- 2 large egg yolks (save the whites for another use)
- 1 tsp vanilla extract
- 2 cups all-purpose flour
- ½ tsp salt
- ½ cup strawberry jam (or other thick jam)
- Equipment: (Standard baking equipment, plus a piping bag or small spoon for jam)
Instructions
- Cream and mix: Cream butter and sugar until fluffy. Beat in egg yolks and vanilla. Gradually mix in flour and salt until a soft dough forms.
- Shape and indent: Roll dough into 1-inch balls. Place on lined baking sheets. Use your thumb or the back of a small measuring spoon to make a deep indentation in the center of each ball.
- Chill: Chill the shaped cookies for 15 minutes. This helps them hold their shape.
- Fill and bake: Preheat oven to 350°F (175°C). Fill each indentation with about ½ teaspoon of jam. Bake 12-14 minutes until the edges are lightly golden.
Notes
- Don’t use thin, runny jam. It will boil over and make a mess. A thick, high-quality jam or preserves works best.
- Chilling the dough after indenting is a pro move. It prevents spreading and keeps your thumbprint deep and defined.
- These are beautiful on a holiday cookie platter. Just sayin’.
So, Which One Are You Baking First?
Phew! That’s quite the cookie lineup. From the sophisticated matcha to the utterly decadent Nutella bombs, there’s a recipe here for every mood, every skill level, and every single one of your cravings. Remember, baking should be fun. A little messy. Sometimes surprising (looking at you, brown butter). But always, always rewarding.
So, pick one that caught your eye. Go get your hands dirty. And when you pull that first tray out of the oven, take a second to enjoy that incredible smell. You made that. Now, go share the love (or don’t—I won’t tell). Happy baking